Showing posts with label crochet hat.. Show all posts

Tuesday, May 31, 2011

Quick Crochet Newborn Baby Beanie

Cat's Beanie-Babe #1

To fit: newborn
Hook size: 4.00mm US G/6
Yarn: 8 ply approx 50 gm’s US DK/Medium
US crochet terms used
Skill level: beginner +
Tension: medium
Time: approx 2 hours

Stitches used:
Sl st= slip stitch
Ch= chain
Hdc= half double crochet  
yo, insert hook into top two loops of stitch,
yo, pull through stitch (3 lps on hook),
yo,  pull through all 3 loops on hook.

Bl= back loop
Fphdc= front post half double crochet
Bphdc= back post half double crochet
Measurements: Head Circumference 13 inches, hat height 5 inches

Row 5 end increases
Row 5 end increases
Length of hat with out ribbed edge

Length of hat with ribbed edge

Special Notes: I like the wrong side of the hdc to show on the out side, but if you prefer to show the right side on the out side, on row 16, work that row into the front loop of the st, this helps for better folding of the ribbed edge

 Wrong side out

Right side out
The beanie begins at the top of the head and worked down to the ribbed edging, the beanie is worked in one piece using the hdc st, which makes a nice closed stitch.
Begin.
Beginning ch 1 of every rnd is not counted as a st.

Chain 4, sl st to first ch to form a ring.

Row 1 ch 1, work 12 hdc into ring, sl st to join in the 1st hdc (you will do this on every round until a ch 2 begins)

Row 2 ch 1, work 2 hdc into each hdc around to end, sl st to join (24 hdc)

Row 3 ch 1, *work 1 hdc into the next 2 hdc, work 2 hdc into the next* repeat from *to* to end, sl st to join (32 hdc)

Row 4 ch 1, *work 1 hdc into the next 3 hdc, work 2 hdc into the next* repeat from *to* to end, sl st to join (40 hdc)

Row 5 ch 1, *work 1 hdc into the next 4 hdc, work 2 hdc into the next* repeat from *to* to end, sl st to join (48 hdc)

Stop increasing
Row 6 to 15 ch 1, work 1 hdc into each hdc around to end, sl st to join

IF YOU WANT YOUR BEANIE LONGER DO MORE ROWS HERE, WORK TO 5.5 INCHES FOR A NEW BORN, THEN FOLLOW THE REST OF THE PATTERN

Row 16 ch 1, work 1 hdc in the back loop of each hdc around to end, (48 hdc),sl st to join by going around the back of the sc (see image)

Making the ribbed edge:

Row 17 ch 2 (the ch 2 is now a new st),* work 1 fphdc around the post of the next hdc, work 1 bphdc around the post of the next hdc,* repeat from *to* to end of the round,  sl st into top of ch 2 to join

Row 18 , 19 and 20, ch 2, *work 1 fphdc around the post of the next fphdc, work 1 bphdc around the post of the next bphdc,* repeat from *to* to end of round, sl st to join, at the end of row 20, finish off yarn leaving a small tail to weave in 
The beanie-babe is designed as a smart grow. 
It will grow with your baby by adjusting the ribbed edge.

Hide loose ends, fold up ribbed edge, add pompom if you choose,or my new beary easy bear applique, link here


Good luck with your baby beanie, I’d love to hear your feed back.
Please do not sell this pattern, please link back to me if you use this pattern, I’d love to see this used for charity, and you can make and sell items from this pattern too.

Ribbed Look Bay Beanie

Tuesday, August 10, 2010

Not Sponge Bob Square Pants Crochet Hat


It was a bit like trying to fit a square peg into a round hole, but I tried.
Sponge Bob round pants hat.

Not Sponge Bob Square Pants Hat


To fit 2 to 4 yr old approx


AU 8 ply yarn (US Light worsted/DK) Less than 50 gm of main color (yellow)


Small amounts of contrasting colours


White, brown, blue, black and red


4.00 mm hook (US G)


US st abbreviation used


Stitches used hdc = yarn over hook, insert hook into st, pull yarn through st, (3 loops on hook) pull yarn through all 3 loops on hook. (htrb AU, UK)


Sc


Hdc foundation row , see video tutorial


Color changing , see video tutorial

Magic circle, see video tutorial

Medium tension used, I am neither a loose or tight crocheter.


Hat begins at crown


Begin.


Beginning ch 1 of every rnd is not counted as a st.


Working with yellow yarn:


Chain up 4, sl st to first ch to form a circle.


Row 1: ch 1, work 12 hdc into ring, sl st to join in the 1st hdc (you will do this on every round)


Row 2: ch 1, work 2 hdc into each hdc around sl st to join (24 hdc)


Row 3: ch 1, *work 1 hdc into the next 2 hdc, work 2 hdc into the next* repeat from *to* sl st to join (32 hdc)


Row 4: ch 1, *work 1 hdc into the next 3 hdc, work 2 hdc into the next* repeat from *to* sl st to join (40 hdc)


Row 5: ch 1, *work 1 hdc into the next 4 hdc, work 2 hdc into the next* repeat from *to* sl st to join (48 hdc)


Row 6: ch 1, *work 1 hdc into the next 5 hdc, work 2 hdc into the next* repeat from *to* sl st to join (56 hdc)


End Increases


Row 7: ch 1, work 1 hdc in each st around sl st to join (56 hdc)


Rows: 8 to 16: repeat row 7, in yellow


Rows: 17 and 18, repeat row 7 in white


Rows: 19 and 20 repeat row 7 in brown


Belt row (can be worked in brown and belt affect can be sewn on later)


Row: 21 *work 4 st’s in brown then 4 st’s in black* repeat from *to* to end


Row: 22 and 23 repeat row 7 in brown, finish off and sew in all ends


Making the features:


Eye’s made with 3 different sized circles: 
Using white: make 2


Make a magic circle and chain 1 (see tutorial for magic circle)


Row 1: work 6 sc into ring, sl st to first sc to join, ch 1 and tighten up magic circle (but not too tight do that when you have finished the circle)


Row 2: work 2 sc in each sc around, sl st to first sc to join, ch 1 (12 sc)


Row 3: *work 1 sc in next sc, work 2 sc in next sc* repeat from *to* to end, sl st to first sc to join, ch 1 (18 sc)


Row 4: *work 1 sc in next 2 sc, work 2 sc in next sc* repeat from *to* to end, sl st to first sc to join, do not ch 1 (24 sc), fin off leaving a long tail for sewing eye’s onto hat


Using blue: make 2


Make a magic circle and chain 1 (see tutorial for magic circle)


Row 1: work 6 sc into ring, sl st to first sc to join, ch 1 and tighten up magic circle (but not too tight do that when you have finished the eye)


Row 2: work 2 sc in each sc around, sl st to first sc to join, do not ch 1 (12 sc) fin off leaving a long tail for sewing eye’s onto hat


Using black: make 2


Make a magic circle and chain 1 (see tutorial for magic circle)


Row 1: work 6 sc into ring, sl st to first sc to join, fin off leaving a long tail for sewing eye’s onto hat and tighten up magic circle


Making teeth use white: make 2


Work a 2 hdc foundation row, finish off leaving long tail for sewing


Making tie using red: make 1


Work a 3 hdc foundaton row, ch 3 work 3 sc in 2nd ch from hook, finish off leaving long tail for sewing


Making nose using yellow: make 1


Start and end with a long tail, work an 8 hdc foundation row fin off, fold nose in half sew one side up finish off, then sew the other side leaving a small opening that will lay flat when sewing onto hat (this will make the nose stand out ward instead of flat)


Putting the eyes together:


Firstly sew in loose ends of all pieces except for the long tail for sewing together and onto hat


Sew blue circle onto white circle in a central position


Sew black circle onto the blue circle in a central position


Sew eyes onto hat making sure they touch one another


Sew nose into the space between the eyes


Hand stitch mouth onto hat coming down from an eye and straight across to the same position on the other eye and go upward to the opposite position you began with (see pictures)


Attach teeth to under mouth, using the nose for a guide, place teeth either side of the nose, so that the nose is centred to the teeth


Place tie below and in between teeth (if you need to sew on belt, do the belt before the tie)


Sew 3 eye lashes above each eye

Sit back and admire your handy work.

You can use this pattern for all purposes, but please do not sell this pattern.

Below are the video tutorials you may need.

This video shows the hdc foundation row.


This video shows how to change colors on the same row (for the belt)


This video shows you how to do the hdc st


This video shows you how to do a magic circle


A big thank you to all of the video tutorial makers.

Friday, June 25, 2010

Four More Flapper Hats

Over the last 2 days I have completed these four adult ear flap hats.
I am trying to write patterns as I go, I have the draft for the granny flapper hat, but I have to make a second one to complete the pattern instructions. The pink and blue ones in this picture have a very similar pattern to the childs ear flap hat pattern I up loaded a few days ago.

These 2 black ones have a different stitch each, one being the granny on the left and on the right is the puff stitch. Both ties have a lovely finish, one has a black rose and the other has curly ends.
Below I made a ladder type of tie for the adult pink ear flap hat. It has the filet st with a scfd row threaded through the centre.
With a small flower attached to the top of the tie, the ladder looks almost like the stem of the flower.
A few simple rows of the colours that are used in the blue earflap hat, finish off this tie nicely, suiting a male or female wearer.

Whilst I am here, I am going to type down some of my instructions for future use. I have so many things jotted down that I can barely tell them apart.

Adult hdc ear flap hat worked almost the same as the childs hdc hat, difference below.
Adult HDC ear flap hat.
1. 12 hdc into ring
2. inc to 24
3. inc to 36
4. work row with out increase
5. inc to 48
6. inc to 60
7. inc to 72
Work with out inc for approx 7 inch measure of hat from top to bottom. Fin
Place ear flap 7 st's away from back centre.
Make ear flap
1. work 12 hdc
2. 3. 4. work 12 hdc
5. dec at each end ( 2nd st in and 2nd lst st)
6.work 10 hdc
7. dec each end
8. work 8 hdc
9. dec each end
10. work 6 hdc
11. dec each end
12. dec each end (2 hdc) fin off.

Edging the same as childs hdc.

Tuesday, June 22, 2010

I made these 3 hats today

I really wish I had the time to write down all the patterns for the hat designs I come up with.
Writing a pattern takes so much time, I can make 4 to 5 hats in the time it takes to write a pattern, I do get some patterns up on my blog, but not as many as I would like to.
Below are some pictures of 3 hats I designed in 1 day.

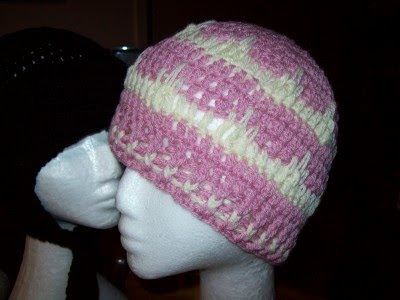
Pink with cream spike.
Cream wave.
Simple black ear flapper hat with a folded peak.

Friday, June 4, 2010

On the move, Crochet Defrosted

Only a few hours previously I was at a stand still, I grabbed some yarn and my hook and began to crochet a hat with the bullion st at the beginning centre, I kept the bullion st going as I increased the rounds, but I got bored with doing the bullion st, so I frogged it and kept 1 round of the bullion st near the beginning. At one stage whilst I was still increasing the rounds of the hat, I stopped almost half way around to have a look and it gave me an idea to make a flap at the front that folded upward, so here it is below with a nice button on each side of the flap. I've seen similar before and liked them.

You can just make out the bullion st here on the top of the hat.

With this blue hat, I made a bit of a granny st in one of the increase rounds.

I crocheted a long band and sewed it around the blue hat and added a silver button.
These were both made with beginning 12 dc and increased in each round until 72 dc.
12-24-36-48-60-72.
I continued a few more rounds and changed the st to the up and down st, which gives a lovely closed decorative st.
When I made the front flap for the red hat, I finished off the hat and re-joined the yarn to the side of the hat and made the flap of 36 dc in the front loops so the flap turned upward, made about 4 rows of dc and left a long thread to sew the flap to the front of the cap.

Saturday, September 12, 2009

Finally Something To Show You All!

Remember in a previous blog post I asked you to guess what I was making? Well here it is. It's a cappuccino hat with saucer and choc chip cookies on the side.
This is the first picture I revealed for you to have a guess at what I was making. I made a basic beanie in a dc and added white fluffly yarn around the edges for the milk froth.

I completed a saucer, by making 2 pieces the same and sewed them onto a round piece of cardboard I cut to shape, then I added the rim you find on the under neath of a saucer, by crocheting over the top of the sc's in the saucer.

I used some pipe cleaners, twisted them together and made a sc cover to sew around the pipe cleaners for the handle.
Another view of the components I used.
So here is the hat and saucer seperate.

This is about where it will be sewed together.

Now it is sewed together.

Now the handle is attached with some choc chip cookies to go with your cuppa. Hope you have enjoyed this original and unique hat. I have made it especially for my step daughter who works part time in a coffee shop, the one who loves and wears all of my crazy hats.

Thursday, May 14, 2009

Crocheted Caps/Beanies

My step daughter Bek' has a friend who admired some of the hat's that I had made for Bek' over time. Her friend asked if I would make her some, as she is about to have chemo therapy for her cancer treatment and can't find any thing slightly flattering or unique. There was an offer of money for payment of the hat, which I refused and explained to Bek' that this year is all about assisting people in need and I would be more than happy to make her a small variety of chemo caps to wear. The lady is about 50, and I sure hope that she likes the styles and colours that I made the caps in.


This first cap is made with black acrylic, which I made with a brim with black eye lash yarn and a glittered multi colour edging that turns upwards so as not to itch the scalp.

This cap has a thinner finished edge which also turns up and is finished off with a yarn that looks similar to small locks of curly hair, a very suttle effect. This cap is a variegated blue, in a very soft tensel and acrylic mixture, finished off with cream edging and a small flowerette with a silver button in the centre.
And just plain cream, but with a lovely simple shell pattern, it almost looks like a cloche hat. I used the same pattern for the cap above, but with out the sc edge.

I made them all in a small size and they took me a casual 4 evenings, I did not write a pattern as I just wanted to enjoy making them, but it was a learning tool for me for future patterns to write.

By doing this for leisure and a cause, I do get great pleasure from it and I do feel better about myself knowing that these will give some one a moment in time to forget about their misfortune, what ever that may be.

Thanks for looking.

Friday, September 5, 2008

Crochet this Week

this is what i crocheted this week
These are my new Spring Hat Designs
And a rear view for you.
This is a mini poncho, pattern from stitch diva.
Bev's Hexagon Baby Jacket, free pattern. From Bev's Country Cottage.
This is a crochet rag, hanging heart.

And a bag I made for a customer order, the photo does not do it much justice.

So I have been a bit slow on the hook this week, we'll see what next week brings, oh and I still have a couple of more days left of this week to go too.