Showing posts with label Crochet for Boys. Show all posts

Sunday, April 6, 2014

Easy Textured Hat Pattern-For baby


To fit 3 months. For newborn size use a 3.5 mm hook and make your hat length approx 4.5 inches prior to hat edge

cats rockin crochet

Introduction: This little hat was designed with the male child in mind, nothing too fancy, just a little texture and a very simple technique makes this the perfect recipe, for a quick and attractive hat for the little man in your life. A sc, ch, sc, is all that it takes! Once you are comfortable with the way the hat is made, it may be time for you to experiment with adding more colors, a fine way to use up left over yarn or co-ordinate colors to match a favorite outfit you have. cats rockin crochet

Hook size: 4mm, US G/6 
Yarn: 8 ply approx 50 gm’s US DK/Medium.
US crochet terms used
Skill level: beginner
Tension: medium
Time: approx 1.5 hours
Stitches used:
Sl st=slip stitch
Ch=chain
Sc = single crochet
Begin:
Ch 4 and sl st into 1st ch to form a circle, or make a magic ring
Rnd 1: ch 1, work 8 sc into ring, to join, sl st into the 1st sc of this round (8 sc)
Rnd 2: ch 1, work 2 sc in each sc to end, to join, sl st into the 1st sc of this round (16 sc)
Rnd 3: ch 1, work 1 sc in first sc, work 2 sc in next sc, *work 1 sc in next sc, work 2 sc in next sc* repeat from *to* to end, to join, sl st into the 1st sc of this round (24 sc)
Rnd 4: ch 1, *work 1 sc into each of the next 2 sc, work 2 sc in next sc* repeat from *to* to end,
to join, sl st into the 1st sc of this round (32 sc)
Row 5: ch 1, *work 1 sc into each of the next 3 sc, work 2 sc in the next sc* repeat from *to* to end, to join, sl st into the 1st sc of this round (40 sc)
Row 6: ch 1, *work 1 sc into each of the next 4 sc, work 2 sc in the next sc* repeat from *to* to end, to join, sl st into the 1st sc of this round (48 sc)
Rnd 7: ch 1, *work 1 sc into each of the next 5 sc, work 2 sc in the next sc* repeat from *to* to end, to join, sl st into the 1st sc of this round (56 sc) 13.5 inches head circumference
Rnd 8: ch 1, work 1 sc in each sc to end, to join, sl st into the 1st sc of this round (56 sc)
Rnd 9: ch 1, work (1 sc, ch 1, 1 sc) in 1st sc, skip the next sc, *work (1 sc, ch 1, 1 sc) in the next sc, skip the next sc* repeat from *to* to end, to join, sl st into the ch 1 space between the first 2 sc (56 sc)
Rnd 10: ch 1, work (1 sc, ch 1, 1 sc) in the next sc, *skip 1 sc work (1 sc, ch 1, 1 sc) in the next sc* repeat from *to* to end, to join, sl st into the ch 1 space between the first 2 sc (56 sc)
Continue with rnd 10 until work measures approx 5.5 inches in length, you must make a join into the very 1st sc of the round on your last row of the simple textured pattern


cats rockin crochet
Hat Edge: work a little loosely, or your hat edge will be too tight
Rnd 1, ch 1, work 1 sc into the very 1st sc, work 1 sc in each sc to end, to join, sl st into the 1st sc of this round (56 sc)

Repeat rnd 1, 3 to 4 more times (or continue for length desired), do not break off yarn if you are making the decorative band
cats rockin crochet
Optional:
Making the decorative band:
Row 1: ch 5, work 1 sc in 2nd ch from hook, work 1 sc in each of the next 3 ch, turn
Row 2: ch 1, work 1 sc in each of the next 4 sc, turn
Repeat row 2: 22 more times, (24 rows total), leave a tail for sewing the tag to the hat edge, begin sewing the 1st row of the tag, then straighten up your work and sew the last row to the hat edge, if you have enough yarn sew your tag in place, add a button on each end of the tag for decoration

cats rockin crochet

Free Pattern Courtesy Of Cat Wood
2014.
You can sell your items made from this free crochet pattern
I’d love to see this pattern used for charity use
Please link back to this pattern if you use it


Wednesday, April 2, 2014

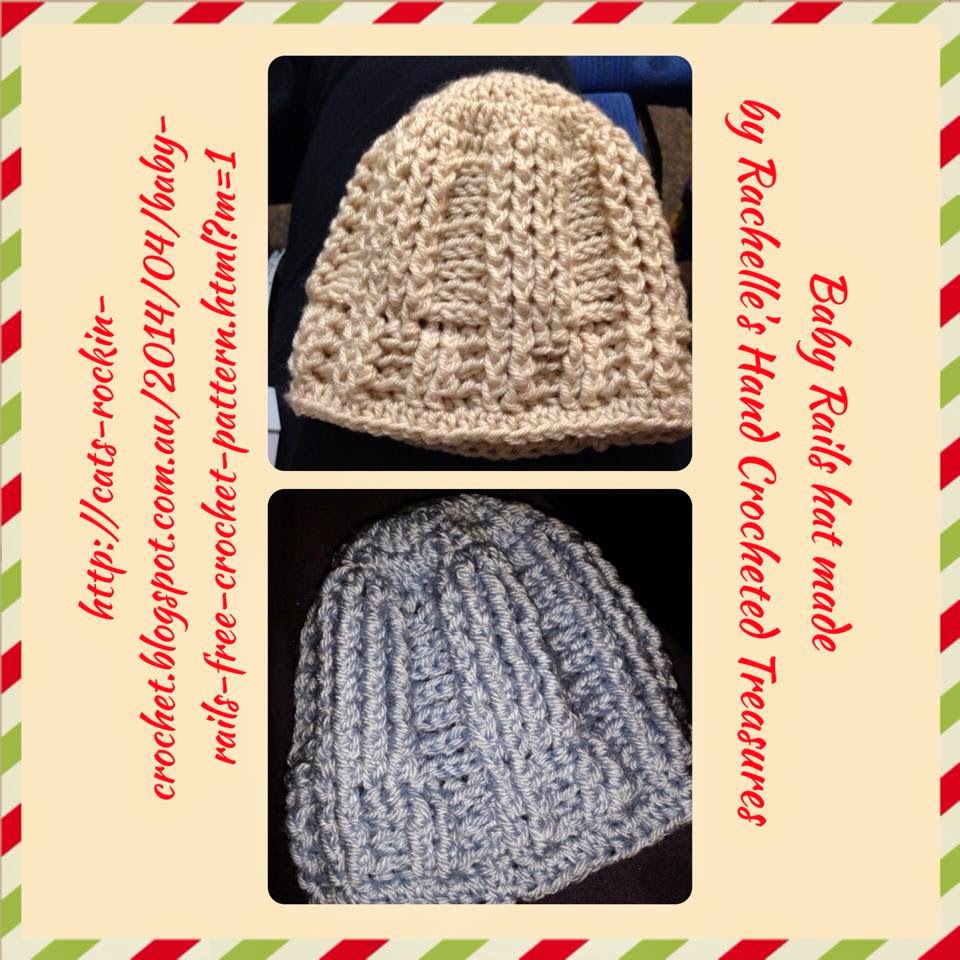
Baby Rails- A Free Crochet Pattern


Introduction: I called this hat baby rails as it looks a little like train tracks, I first made one for my new born grandson Jack, I wanted a masculine looking hat for a boy, he looked so cute in his baby rails hat that I had to write the pattern for it. I love the look of the fpdc and bpdc together, wide or narrow gaps between each stitch give such a uniformed and neat look, I'm sure your little boy will look so smart in his baby rails hat. Free crochet pattern below.
To fit: 2 sizes, new born to 3 months, 3 to 9 months

Hook size: AU 4mm, US G/6
Yarn: AU 8 ply, US dk, approx 100 gms
US crochet terms used
Skill level: Beginner +
Tension: medium
Time: approx 2 hours
Stitches used:
ch = chain
hdc = half double crochet
dc = double crochet
fpdc = front post double crochet
bpdc = back post double crochet

Please note! The beginning ch 2 of every rnd is not counted as a st.
BEGIN:
Chain 4, sl st to first ch to form a ring. Or use a magic ring.
Row 1, ch 2, work 12 dc into ring, to join, sl st into the 1st dc of this round, (you will join this way on every round)
(Increase in every st)
Row 2, ch 2, work 2 dc into each dc to end, to join, sl st into the 1st dc of this round, (24 dc)
(Increase in every 2nd st)
Row 3, ch 2, work 1 dc in same place as join, work 2 dc into the next dc, *work 1 dc in next dc, work 2 dc into the next dc*, repeat from *to* to end, to join, sl st into the 1st dc of this round, (36 dc)
(Increase in every 3rd st)
Row 4, ch 2, work 1 dc in same place as join, work 1 dc into the next dc, work 2 dc into the next dc, * work 1 dc into each of the next 2 dc, work 2 dc into the next dc*,  repeat from *to* to end, to join, sl st into the 1st dc of this round, (48 dc) for new born to 3 months stop increases here and go onto the pattern approx 13.5 inch circumference
(Increase in every 4th st)
Row 5, ch 2, work 1 dc in same place as join, work 1 dc into each of the next 2 dc, work 2 dc into the next dc, * work 1 dc into each of the next 3 dc, work 2 dc into the next dc*,  repeat from *to* to end, to join, sl st into the 1st dc of this round, (60 dc) for 3 to 9 months stop increases, approx 15.5 inch circumference
Row 6, for size 3 to 6 months only, ch 2, work 2 dc in same place as join, *work 1 dc in each of next 14 dc, work 2 dc in next dc,* repeat from *to* 2 more times, work 1 dc in each of the next 14 dc, to join, sl st into the 1st dc of this round, (64 dc)


Pattern Row. The pattern is an 8 st count that needs to be multiplied by an even number, for the look desired.
the ch 2 is not counted as a st
Row 1, ch 2,(do not work into the ch 2 of the previous row) *work 1 fpdc around each of the next 4 dc, work 1 bpdc around each of the next 4 dc* repeat from *to* to end, to join, sl st into the top of the 1st fpdc of this round
Row 2, ch 2,(do not work into the ch 2 of the previous row) *work 1 fpdc around each of the next 4 fpdc, work 1 bpdc around each of the next 4 bpdc* repeat from *to* to end, to join, sl st into the top of the 1st fpdc of this round.
For newborn to 3 month size, repeat row 2 until your hat measures approx 4.5 inches in length, then continue onto the rib edging
For 3 to 9 months size, repeat row 2 until your hat measures approx 5.5 inches in length, then continue onto the rib edging
Rib Edging
Row 1, ch 2, work 1 fpdc around each of the next 2 st's, work 1 bpdc around each of the next 2 st's* repeat from *to* to end, to join, sl st into the top of the 1st fpdc of this round.
Row 2, to row 3, repeat row 1 of rib edging (or continue for length desired)
Row 4, ch 1, work 1 hdc in each st to end, to join, sl st into the top of the 1st hdc of this round, finish off and sew in ends


 Rachelle Herron, say's
"Loving this pattern from Cathy Wood at Cats Rockin Crochet. It is quick and easy and has awesome texture. I used some leftover Panda soft I had"

Rachelle has done it again!
Why not team the baby rails hat pattern with the one piece bootie pattern, they look fantastic together! Thank you Rachelle.

Free Pattern Courtesy Of Cat Wood
2014.
You can sell your items made from this free crochet pattern
I’d love to see this pattern used for charity use
Please link back to this pattern if you use it

Sunday, March 30, 2014

Free Crochet Patterns For Boys


Where to find free crochet patterns for boys

There does not seem to be a very large selection of free crochet patterns for boys available, yet some of the patterns I did find are of high quality along with the cute factor.
I have put a selection of a few that I have found here and as I find more I will up date the list.
You can find this little beauty at Red Heart, free crochet pattern
Here is one for the older boy from Red Heart too, free crochet pattern
This is a baby hooded cardigan by LisaAuch, free crochet pattern
A sweater for junior, I can see many colour options, free crochet pattern
How about an aviator hat? by LisaAuch, free crochet pattern
This little baby to 3 months is so cute, free crochet pattern
A really easy to make newborn vest, free crochet pattern
A floppy brim army hat, with various sizes, free crochet patternboys-floppy-brimmed-army-hat1
Cats-Rockin-Crochet sharing, free crochet patterns for boys.

Thursday, January 30, 2014

Ripple Stitch Hat. Free Crochet Pattern


Adult Size Crochet Ripple Stitch/Chevron Stitch Hat


  My inspiration for this pattern was Joel Maddens hair color, he changes it every week or maybe every day. 

He is a coach on The Voice.


I usually make my medium hats with a beginning crown of 72 st's, but the pattern used for the hat, made it shrink, so I had to start over with a crown count of 84 st's, it was a perfect count as the stitch pattern is dividable by 14 st's.

Below is the 70 st count for the crown, it was too small for a medium adult
a free crochet pattern for a chevron hat

 Below is the 84 st count, big difference!
crochet chevron hat


Hook size: AU 4.00mm. US G/6
Yarn ply: AU 8 ply. US 4 ply medium approx 120 gm’s
Tension: 9 dc’s, 2 inches wide. 1 dc, half inch high
US terms used
Beginner +
Time approx 3 hours: Size medium adult

Stitches used:
Ch = chain
Sl st = slip st
Sc = single crochet
Hdc = half double crochet
Dc = double crochet
Fphdc = front post half double crochet
Bphdc = back post half double crochet
Dec = decrease
Inc = Increase = more than 1 stitch in the same stitch
Yo = yarn over hook

Special Instructions:

Pattern is a 14 stitch repeat. Make your crown (end count) in multiples of 14. Example, I am using 84 dc which was an easy target to get to using the basic dc crown; I increased in 1 more row.
 I am using this size as the pattern tends to shrink down one size, so I am calling this size a medium.
Very small adult size you will need 70 dc st’s in the crown. You can manipulate the stitch count by adding or subtracting a stitch anywhere in the last row of making your crown, you may need to add or subtract 2 or 4 st’s, but that’s okay.

dc dec, next 3 st’s = yo hook, insert hook into next st, pull up a loop (3 loops on hook), yo pull through 2 loops only, yo hook, , insert hook into next st, pull up a loop (4 loops on hook), ), yo pull through 2 loops only,  yo hook, insert hook into next st, pull up a loop (5 loops on hook), yo pull through 2 loops, yo pull through remaining 4 loops on hook

To begin make the basic dc crown found here.
To get 84 st’s complete row 7 below.

Row 7, Ch 3, work 1 dc in next 4 dc, work 2 dc in next dc, *work 1 dc in each of next 5 dc, work 2 dc in next dc,* repeat from *to* to end, sl st to join in top of ch 3 (84 dc)


Set Up Row for Pattern, (color changes will not be mentioned)

Row 1, Ch 3, work 1 dc in the next 3 st’s, work 1 sc in the next 6 st’s, *work 1 dc in the next 8 st’s, , work 1 sc in the next 6 st’s,* repeat from*to* to the last 4 st’s, work 1 dc in the next 4 st’s, , sl st to join in top of ch 3

Pattern:

Row 2, Ch 3, work 2 dc’s in same space as sl st (inc made), work 1 dc in next 3 st’s, dc dec, next 3 st’s (dec made), dc dec, next 3 st’s (dec made),  work 1 dc in next 3 st’s, work 3 dc’s in the next st (inc made),
(14 st, pattern just made)
*work 3 dc’s  in the next st (inc made), work 1 dc in next 3 st’s, dc dec, next 3 st’s (dec made), dc dec, next 3 st’s (dec made),  work 1 dc in next 3 st’s, work 3 dc’s  in the next st (inc made),* repeat from *to* to end of the round, sl st to join in top of ch 3

Row 3 and remaining rows of pattern, repeat pattern row 2 approx 6 or 7 times in total (or length desired i.e: slouch look)

how to crochet a chevron hat

It’s up to you if you want a straight hat edge or the wave hat edge. If you want the wave hat edge add more rows of the pattern for length desired

Straight Hat Edge

Row 1, work 1 sc in the next 4 st’s, work 1 dc in the next 7 st’s, work 1 sc in the next 3 st’s. *work 1 sc in the next 3 st’s, work 1 dc in the next 8 st’s, work 1 sc in the next 3 st’s* repeat from *to* to end, sl st into the first st of the round

Special size instructions:
For a tighter hat edge replace the hdc with sc’s.
For a looser hat edge replace the hdc with dc’s.

Row 2, ch 2 (first hdc), work 1 hdc in each st to end of the round, sl st into ch 2 space to join

Row 3, ch 2,* work 1 bphdc in next st, work 1 fphdc in next st,* repeat from *to* to end, sl st into ch 2 space to join

Row 4, repeat row 3 for length desired.

Finish off and tie in ends.
crochet chevron or ripple stitch hat for an adult free pattern
 You may find this amusing, this is how I jotted down the pattern as I made the hat and pattern.
  
Chickie Magoo helped test this pattern and she did find a mistake, lucky for me she did!
This is her hat made from the pattern
Chickie chose a slouch look.
This is Chickie's feed back.

I opted to add a few rows of FPHDC/BPHDC to enhance the slouch look. Just a note, the depth from crown to edge is a tad long for a non-slouch @ 84 sts ... at least it is for me. My head circ is 22". This hat measures 8" from top of crown to the beginning of the post stitch edge, then another inch for the post stitch edging.... that's why it's slightly slouchy. I don't mind that look so it's all good but just so you know. As for speed, once I figured out the pattern, it was a breeze and didn't take long at all, no more than just a plain hat really and the repeats are very easy to remember. After the first coloured stripe (once I figured it out lol) I didn't need to refer back to the pattern till I got to the straight edge... I would say it's quicker than it looks! Thank YOU x
crochet chevron hat, adult size, ripple stitch

chevron crochet hat free pattern

crochet ripple stitch hat, a free pattern


 Good luck with your project, I’d love to hear your feed back. Please do not sell this pattern, please link back to me if you use this pattern, I’d love to see this used for charity, and you can make and sell items from this pattern too.
 TO PRINT OUT THE PATTERN, COPY AND PASTE TO A WORD DOCUMENT ON YOUR COMPUTER.

Sunday, February 15, 2009

Second Froggy Hat For Aaron

You may remember this post here, the first hat I made was too small. I tried it on my grandsons and it was the right size for my one year old grandson and Aaron is 3 years old. So I went back to the drawing board and made a second one to fit Aaron. Being the second time around it was much quicker to make the features and I also used (US) dc instead of the original sc. So now they are ready to make their way to the US for little Aaron. I'm hoping Aaron may have a favourite Teddy Bear he can put the smaller froggy hat on.

Thursday, February 5, 2009

Crochet And Feel Good

Once I had finished this small duo, I did feel good!
A plea came from a crochet friend to help a 3 year old little boy named Aaron, who has cancer. We were told of his favourite colours, which were green and yellow, we were also asked for a 12 inch square to go into the making of an afghan for Aaron. Of course this was all voluntary. I had been wanting to make a mitered square and I also find this type of square eye catching. I also thought if he likes green, he probably likes frogs, so I made him a frog hat too. I used my pattern for the floppy brimmed boys army hat, I did not have a size 3. Using the size 2 as a guide, I just went up a half a hook size and added an extra round of increase. I left off the brim and made a band around the hat that can be folded or unfolded, I thought this would cover any difference in sizing, not knowing the size of Aarons head.
Once I had completed this little project for Aaron, I did feel good about myself knowing this was going to a good cause.


Wednesday, December 19, 2007

Crochet Toy Aeroplane.

make a crochet aerolane My Grandson Cooper loves aeroplane's. I came across a free pattern to make one. As you can see, it is a small plane and it makes up very quickly. You can find the pattern here.

Monday, October 22, 2007

Crocheted Boys, Floppy Brimmed Army Hat

<!-- cats-rockin-crochet_crosscol_AdSense1_468x60_as

Floppy Brimmed Army Hat.

Floppy Brimmed Army Hat
-->

Size 2 Hat Pictures


Size 6 Hat Pictures

Materials: 8 ply yarn. (light worsted/ sport) with a camouflage effect.
US terms used
Size: 4.00mm Hook. (US.G/6) (UK 8)
Instructions given for sizes 2 to 10
Pattern tested for size 2 and 6 only
hdc= yarn over hook, insert hook into st, pick up yarn pull through st, (3 loops on hook) pull yarn through all 3 loops.
trbl= yarn over hook, insert hook into st, pick up yarn pull through st, (3 loops on hook) pull yarn through 2 loops, (2 loops on hook) pull yarn through 2 loops again.
I had a 100gm ball of the camouflage effects yarn. I made the size 2 hat first, I used a little bit of the yarn on the toy soldier boy and the rest on the size 6 hat. I knew I was going to run short of this yarn with the size 6 hat, so I used a co-ordinating colour that doubles for a built in hat band.
*Stay tuned for the soldier boy pattern*


Beginning at crownWorking in rounds, do not join. Use a stitch marker to mark rounds or use the tail of the beginning yarn

All sizes.
Ch. 2Rnd 1: Sc 8 sc, in the first loop, 8 sc
Rnd 2: 2 sc in each sc around, 16 sc
Rnd 3: *sc in first sc, 2 sc in next sc repeat from * around 24 sc.
Rnd 4: *sc in next 2 sc, 2 sc in next sc, repeat from * around 32 sc.
Rnd 5 and 6: 1 sc in each sc around
Rnd 7: *sc in next 3 sc, 2 sc in next sc repeat from * around; 40 sc.
Rnd 8: *sc in next 4 sc, 2 sc in next sc, repeat from * around 48 sc.
Rnd 9: *sc in next 5 sc, 2 sc in next sc, repeat from * around 56 sc.
Rnd 10: *sc in next 6 sc, 2 sc in next sc, repeat from * around
64 sc. FOR SIZE 2, STOP INCREASING HERE
AND WORK 17 ROWS OF *1 SC IN EACH SC AROUND*. THEN PROCEED TO DIRECTIONS FOR THE BRIM OF THE HAT. (64 SC)
Rnd 11: *sc in next 7 sc, 2 sc in next sc, repeat from * around 72 sc.

(Stop here for size 4 and work 18 rows of sc around, go to brim of hat)
Rnd 12: *sc in next 8 sc, 2 sc in next sc, repeat from * around 80 sc.
FOR SIZE 6, STOP INCREASING HERE
AND WORK 18 ROWS OF *1 SC IN EACH SC AROUND*. THEN PROCEED TO THE DIRECTIONS FOR THE BRIM OF THE HAT

Sizes, 8 and 10 only continue here
Rnd 13: *sc in next 9 sc, 2 sc in next sc, repeat from * around
88 sc (Stop here for size 8 and continue as for size 6)Rnd 14: *sc in next 10 sc, 2 sc in next sc, repeat from * around
96 sc
Rnd 15 to 34: 1 sc in each sc around (do not break off yarn) complete instructions for brim of hat.

Brim of hat
The following rows are all worked in back loops only.
(There is no need for strict accuracy of the amount of sc or hdc stitches, a few extra or less does not matter at this point)

Rnd 1: *hdc in next 4 sc, 2 hdc in next sc, repeat from* around
Rnd 2: *trbl in next 4 hdc, 2 trbl in next hdc, repeat from * around
Rnd 3: *trbl in next 6 trbl, 2 trbl in next trbl, repeat from * around
Rnd 4: *hdc in each trbl around.

Finish off if you are happy with the width of the brim or continue with rnd 3 and 4 of the brim instructions.
See pictures for examples of size 2 and size 6.

Please feel free to use my pattern, but do not copy or sell my pattern.
© Cathy Wood. 2007


Thursday, October 18, 2007

CROCHETED ARMY FLOPPY HAT


Crocheted Army Floppy Hat

I also made an army boy amigurumi

This is Cooper.

I am currently working on this pattern for a childs army floppy hat.

I initially made the hat above for my grandson Darcy who is 5, but it fits my grandson Cooper who is 2.

This proves the need to measure your subject or use a sizing chart instead of guessing.

You learn something new all the time.
I will be posting the pattern soon.


This is Darcy.


This is the hat for Darcy.

Wednesday, October 3, 2007

Coopers Vest

I found a pattern for a simple childs vest, added some multi color yarn along with the plain yarn, then I chose to make a motiff of a bear, which looked more like a cat, so now we have a cat motiff that is a little cross eyed and wears a red bow.

Below is Cooper, who will be 2 in a couple of months.

He just happens to be spoilt by me, but so do all of the other grand kids.

I've taught him to cook and wash dishes.