Wednesday, April 2, 2014

Baby Rails- A Free Crochet Pattern


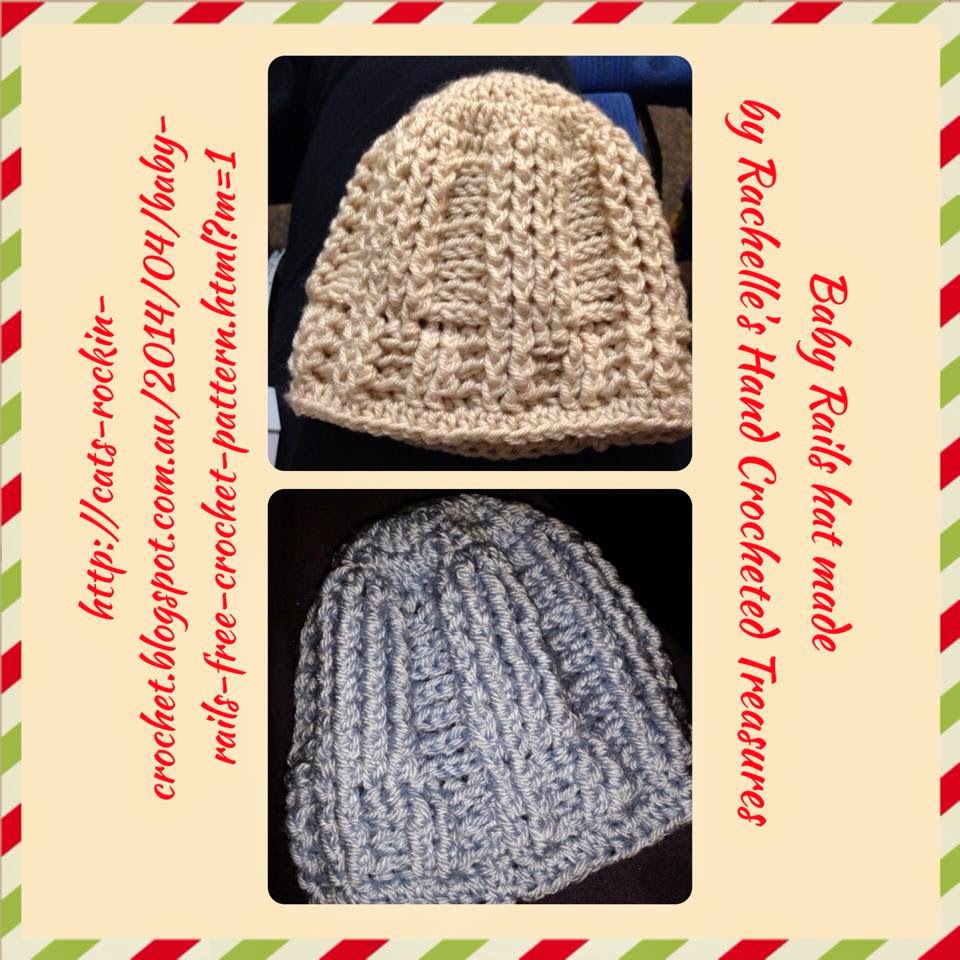
Introduction: I called this hat baby rails as it looks a little like train tracks, I first made one for my new born grandson Jack, I wanted a masculine looking hat for a boy, he looked so cute in his baby rails hat that I had to write the pattern for it. I love the look of the fpdc and bpdc together, wide or narrow gaps between each stitch give such a uniformed and neat look, I'm sure your little boy will look so smart in his baby rails hat. Free crochet pattern below.
To fit: 2 sizes, new born to 3 months, 3 to 9 months

Hook size: AU 4mm, US G/6
Yarn: AU 8 ply, US dk, approx 100 gms
US crochet terms used
Skill level: Beginner +
Tension: medium
Time: approx 2 hours
Stitches used:
ch = chain
hdc = half double crochet
dc = double crochet
fpdc = front post double crochet
bpdc = back post double crochet

Please note! The beginning ch 2 of every rnd is not counted as a st.
BEGIN:
Chain 4, sl st to first ch to form a ring. Or use a magic ring.
Row 1, ch 2, work 12 dc into ring, to join, sl st into the 1st dc of this round, (you will join this way on every round)
(Increase in every st)
Row 2, ch 2, work 2 dc into each dc to end, to join, sl st into the 1st dc of this round, (24 dc)
(Increase in every 2nd st)
Row 3, ch 2, work 1 dc in same place as join, work 2 dc into the next dc, *work 1 dc in next dc, work 2 dc into the next dc*, repeat from *to* to end, to join, sl st into the 1st dc of this round, (36 dc)
(Increase in every 3rd st)
Row 4, ch 2, work 1 dc in same place as join, work 1 dc into the next dc, work 2 dc into the next dc, * work 1 dc into each of the next 2 dc, work 2 dc into the next dc*,  repeat from *to* to end, to join, sl st into the 1st dc of this round, (48 dc) for new born to 3 months stop increases here and go onto the pattern approx 13.5 inch circumference
(Increase in every 4th st)
Row 5, ch 2, work 1 dc in same place as join, work 1 dc into each of the next 2 dc, work 2 dc into the next dc, * work 1 dc into each of the next 3 dc, work 2 dc into the next dc*,  repeat from *to* to end, to join, sl st into the 1st dc of this round, (60 dc) for 3 to 9 months stop increases, approx 15.5 inch circumference
Row 6, for size 3 to 6 months only, ch 2, work 2 dc in same place as join, *work 1 dc in each of next 14 dc, work 2 dc in next dc,* repeat from *to* 2 more times, work 1 dc in each of the next 14 dc, to join, sl st into the 1st dc of this round, (64 dc)


Pattern Row. The pattern is an 8 st count that needs to be multiplied by an even number, for the look desired.
the ch 2 is not counted as a st
Row 1, ch 2,(do not work into the ch 2 of the previous row) *work 1 fpdc around each of the next 4 dc, work 1 bpdc around each of the next 4 dc* repeat from *to* to end, to join, sl st into the top of the 1st fpdc of this round
Row 2, ch 2,(do not work into the ch 2 of the previous row) *work 1 fpdc around each of the next 4 fpdc, work 1 bpdc around each of the next 4 bpdc* repeat from *to* to end, to join, sl st into the top of the 1st fpdc of this round.
For newborn to 3 month size, repeat row 2 until your hat measures approx 4.5 inches in length, then continue onto the rib edging
For 3 to 9 months size, repeat row 2 until your hat measures approx 5.5 inches in length, then continue onto the rib edging
Rib Edging
Row 1, ch 2, work 1 fpdc around each of the next 2 st's, work 1 bpdc around each of the next 2 st's* repeat from *to* to end, to join, sl st into the top of the 1st fpdc of this round.
Row 2, to row 3, repeat row 1 of rib edging (or continue for length desired)
Row 4, ch 1, work 1 hdc in each st to end, to join, sl st into the top of the 1st hdc of this round, finish off and sew in ends


 Rachelle Herron, say's
"Loving this pattern from Cathy Wood at Cats Rockin Crochet. It is quick and easy and has awesome texture. I used some leftover Panda soft I had"

Rachelle has done it again!
Why not team the baby rails hat pattern with the one piece bootie pattern, they look fantastic together! Thank you Rachelle.

Free Pattern Courtesy Of Cat Wood
2014.
You can sell your items made from this free crochet pattern
I’d love to see this pattern used for charity use
Please link back to this pattern if you use it

Sunday, March 30, 2014

Free Crochet Patterns For Boys


Where to find free crochet patterns for boys

There does not seem to be a very large selection of free crochet patterns for boys available, yet some of the patterns I did find are of high quality along with the cute factor.
I have put a selection of a few that I have found here and as I find more I will up date the list.
You can find this little beauty at Red Heart, free crochet pattern
Here is one for the older boy from Red Heart too, free crochet pattern
This is a baby hooded cardigan by LisaAuch, free crochet pattern
A sweater for junior, I can see many colour options, free crochet pattern
How about an aviator hat? by LisaAuch, free crochet pattern
This little baby to 3 months is so cute, free crochet pattern
A really easy to make newborn vest, free crochet pattern
A floppy brim army hat, with various sizes, free crochet patternboys-floppy-brimmed-army-hat1
Cats-Rockin-Crochet sharing, free crochet patterns for boys.

Wednesday, March 26, 2014

Free Crochet Hat Patterns Just For Baby


I have gathered a selection of my popular, free baby crochet hat patterns and placed them on one page for a quick one stop and view, just for you!

Just find your favorite and click on it's link, that will then take you to the free crochet hat pattern page

Little Fans Down Under-Beanie Babe
Free Crochet Pattern

 The Shy Butterfly-Baby Beanie
Free Crochet Pattern

The Baby Scale
Free Crochet Pattern

Little Wraps-Baby Beanie
Free Crochet Pattern

Little Cluster Beanie Babe Hat 
Free Crochet Pattern
This is my new born grandson wearing the above hat, he weighed 6.6lb, he will get lots of wear out of this hat as you can see.
The Baby Chain-Baby Hat
Free Crochet Pattern 
 Please continue to drop by Cats-Rockin-Crochet for more free crochet patterns, not only for baby, but for the child and adults too!


Wednesday, March 19, 2014

Botanic Ridge-Adult Hat-Free Crochet Pattern


 Botanic Ridge-Adult Hat-Free Crochet Pattern

Introduction: If you want a quick and easy free crochet hat pattern that has the wow factor, this is for you! The pattern stitch is made over 2 rows only and repeated for length desired, with or without the ribbed edging this hat looks stunning. There are 2 adult sizes included in the instructions; there will also be a beret style of this pattern coming very soon.
To fit: Adult, 2 sizes, small to medium, medium to large
Measurements approx: 17 inches in circumference/ approx 19.5 inches in circumference
Please note, by using a smaller or larger hook, you can make a smaller or larger beanie
Hook size: 4mm, US G/6 (see introduction)
Yarn: 8 ply approx 100 gm’s US DK/Medium.
US crochet terms used
Skill level: beginner +
Tension: medium
Time: approx 2 hours
Stitches used:
Sl st=slip stitch
Ch=chain
Sc = single crochet
Dc =double crochet
Bpdc = back post double crochet
Fpdc=front post double crochet
Cluster = A 2 dc cluster st. Yo hook, insert hook into st, pull up a loop, yo and pull through 2 loops on hook (2 loops left on hook), yo hook, insert hook into same st and pull up a loop (4 loops left on hook), yo hook and pull through 2 loops on hook (3 loops left on hook), yo hook and pull through all loops on hook. A 2 dc cluster made.
Special stitch: Triple clusters = work (2 dc cluster, ch 3, 2 dc cluster, ch 3, 2 dc cluster) all in the same stitch

Please note! The beginning ch 2 of every rnd is not counted as a st.
BEGIN:
Chain 4, sl st to first ch to form a ring. Or use a magic ring.
Row 1, ch 2, work 12 dc into ring, to join, sl st into the 1st dc of this round, (you will join this way on every round)
(Increase in every st)
Row 2, ch 2, work 2 dc into each dc to end, to join, sl st into the 1st dc of this round (24 dc)
(Increase in every 2nd st)
Row 3, ch 2, work 1 dc in same place as join, work 2 dc into the next dc, *work 1 dc in next dc, work 2 dc into the next dc*, repeat from *to* to end, to join, sl st into the 1st dc of this round (36 dc)
(Increase in every 3rd st)
Row 4, ch 2, work 1 dc in same place as join, work 1 dc into the next dc, work 2 dc into the next dc, *work 1 dc into each of the next 2 dc, work 2 dc into the next dc*, repeat from *to* to end, to join, sl st into the 1st dc of this round (48 dc)
(Increase in every 4th st)
Row 5, ch 2, work 1 dc in same place as join, work 1 dc into each of the next 2 dc, work 2 dc into the next dc, *work 1 dc into each of the next 3 dc, work 2 dc into the next dc*, repeat from *to* to end, to join, sl st into the 1st dc of this round (60 dc)
(Increase in every 5th st)
Row 6, ch 2, work 1 dc in same place as join, work 1 dc into each of the next 3 dc, work 2 dc into the next dc, *work 1 dc into each of the next 4 dc, work 2 dc into the next dc*, repeat from *to* to end, to join, sl st into the 1st dc of this round (72 dc) small to medium size stop increases here and go on to the pattern
(Increase in every 6th st)
Row 7, ch 2, work 1 dc in same place as join, work 1 dc into each of the next 4 dc, work 2 dc into the next dc, *work 1 dc into each of the next 5 dc, work 2 dc into the next dc*, repeat from *to* to end, to join, sl st into the 1st dc of this round, (84 dc) medium to large size, stop increases here and go on to the pattern
Begin Pattern: See special stitch instructions for the triple clusters
Row 1, ch 2, work 1 dc in same place as join, work 1 dc in next dc, work 1 fpdc around the next dc, skip 3 st’s, work the triple clusters in next st, skip 3 st’s, work 1 fpdc around the next dc, *work 1 dc into each of the next 3 dc, work 1 fpdc around the next dc, skip 3 st’s, work the triple clusters in next st, skip 3 st’s, work 1 fpdc around the next dc*,  repeat from *to* to last dc of the round, work 1 dc in the last dc, to join, sl st into the 1st dc of this round
Row 2, ch 2, work 1 dc in same place as join, work 1 dc in next dc, work 1 fpdc around the next dc, ch 3, work 1 sc in the top of the 2nd cluster, ch 3, work 1 fpdc around the next dc, *work 1 dc into each of the next 3 dc, work 1 fpdc around the next dc, ch 3, work 1 sc in the top of the 2nd cluster, ch 3, work 1 fpdc around the next dc*, repeat from *to* to last dc of the round, work 1 dc in the last dc, to join, sl st into the 1st dc of this round
Row 3, ch 2, work 1 dc in same place as join, work 1 dc in next dc, work 1 fpdc around the next dc, work the triple clusters in the next sc, work 1 fpdc around the next dc, *work 1 dc into each of the next 3 dc, work 1 fpdc around the next dc, work the triple clusters in the next sc, work 1 fpdc around the next dc*, repeat from *to* to last dc of the round, work 1 dc in the last dc, to join, sl st into the 1st dc of this round
Row 4, repeat row 2
Row 5, repeat row 3
Row 6, repeat row 2
Row 7, repeat row 3
Row 8, repeat row 2
Row 9, repeat row 3
Row 10, repeat row 2
Row 11, repeat row 3
Row 12, repeat row 2, my hat is now approx 7 inches in length, you can continue with pattern for length desired, you have the option to add a ribbed hat edge or finish off on a pattern row of your choice
Ribbed Edging:
Row 1, ch 2, work 1 dc in same place as join, work 1 dc in next dc, work 1 fpdc around the next dc, work 3 dc in the ch 3 space, work 1 dc in the sc, work 3 dc in the ch 3 space, work 1 fpdc around the next fpdc, *work 1 dc into each of the next 3 dc, work 1 fpdc around the next dc, work 3 dc in the ch 3 space, work 1 dc in the sc, work 3 dc in the ch 3 space, work 1 fpdc around the next fpdc* repeat from *to* to last dc of the round, work 1 dc in the last dc, to join, sl st into the 1st dc of this round, (small size, 72 dc large size, 84 dc)
Row 2, ch 2, work 1 bpdc in same place as join, work 1 fpdc around each of the next 2 st’s, *work 1 bpdc around each of the next 2 st’s, work 1 fpdc around each of the next 2 st’s*, repeat from *to* to last dc of the round, work 1 bpdc around the last st, to join, sl st into the 1st dc of this round
Row 3, repeat row 2
Row 4, repeat row 2, finish off or continue for length desired


Free Pattern Courtesy Of Cat Wood
2014.

You can sell your items made from this free crochet pattern
I’d love to see this pattern used for charity use
Please link back to this pattern if you use it