Tuesday, February 4, 2014

Crochet Little Sound Waves Beanie Babe Hat. Free Pattern


Crochet Little Sound Waves Beanie Babe Hat


An easy 22 row baby beanie hat pattern with a little bit of decoration


To fit: newborn,
Measurements approx: Head Circumference 13 inches, hat height 5 to 6 inches

Please note, by using a smaller or larger hook, you can make a smaller or larger beanie

Hook size: 4.00mm US G/6
Yarn: 8 ply approx 50 gm’s US DK/Medium.
Small amounts of extra color or colors
US crochet terms used
Skill level: beginner +
Tension: medium
Time: approx 2 hours

Stitches used:
Sl st=slip stitch
Ch=chain
Sc = single crochet
Hdc= half double crochet
Dc =double crochet
Fpdc=front post double crochet


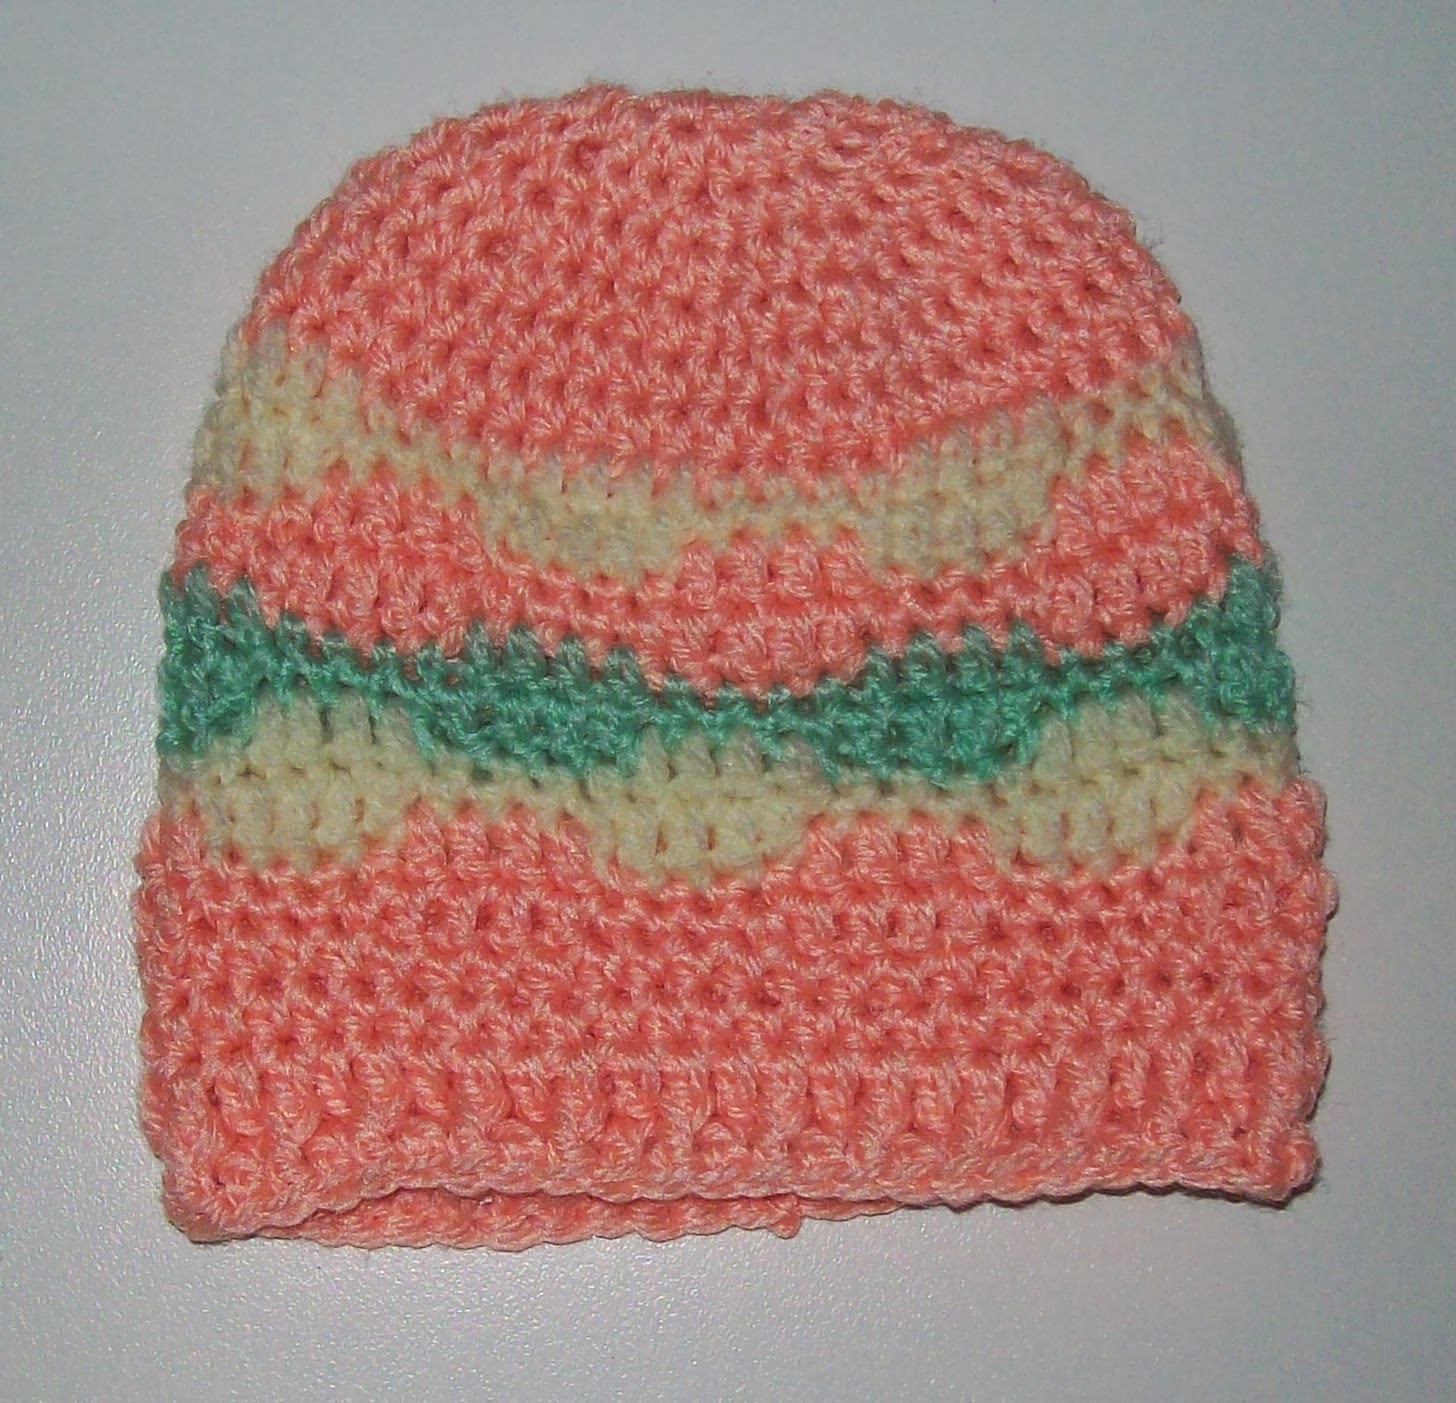
Introduction: The little sound wave st is worked over 8 st’s and 4 rows, the first sound waves pattern row uses, 4 dc, 4 sc, repeating the sequence until the end of the row. The following row is a repeat of the 1st row.
Changing colors on the next wave rows makes this pattern st stand out.
The 3rd row is also worked over 8 st’s, 4 sc, 4 dc, repeating the sequence until the end of the row. The following 4th row is a repeat of the 3rd row.
The above pattern rows are repeated 1 and a half more times for this size only.
The beanie begins at the top of the head and worked down to the ribbed edging

Please note! The beginning ch 1 and ch 2 of every rnd is not counted as a st.
BEGIN:
Chain 4, sl st to first ch to form a ring. Or use a magic ring.

Row 1, ch 1, work 12 hdc into ring, sl st to join in the 1st hdc (you will join this way on every round)

(Increase in every st)
Row 2, ch 1, work 2 hdc into each hdc to end, sl st to join (24 hdc)

(Increase in every 3rd st)
Row 3, ch 1, *work 1 hdc into the next 2 hdc, work 2 hdc into the next* repeat from *to* to end, sl st to join (32 hdc)

(Increase in every 4th st)
Row 4, ch 1, *work 1 hdc into the next 3 hdc, work 2 hdc into the next* repeat from *to* to end, sl st to join (40 hdc)

(Increase in every 5th st)
Row 5, ch 1, *work 1 hdc into the next 4 hdc, work 2 hdc into the next* repeat from *to* to end, sl st to join (48 hdc)

(Stop increases)
Row 6, ch 1, work 1 hdc in each hdc to end, sl st to join (48 hdc)

Row 7, repeat Row 6

(Little Sound waves pattern begins here)
Change color
Row 8, Ch 2, work 1 dc in same space as join and ch2, work 1 dc in each of the next 3 st’s, work 1sc in each of the next 4 st’s, *work 1 dc in each of the next 4 st’s, work 1 sc in each of the next 4 st’s* repeat from *to* to end, sl st to join in the top of the 1st dc of this round (48 st’s)

Row 9, repeat Row 8

 Change color
Row 10, ch 1, *work 1 sc in each of the next 4 dc, work 1 dc in each of the next 4 sc,* repeat from *to* to end, sl st to join in the first sc of this round (48 st’s)

Row 11, repeat Row 10


Change color
Rows 12, Ch 2, work 1 dc in same space as join and ch2, work 1 dc in each of the next 3 sc’s, work 1sc in each of the next 4 dc’s, *work 1 dc in each of the next 4 sc’s, work 1 sc in each of the next 4 st’s* repeat from *to* to end, sl st to join in the top of the 1st dc of this round (48 st’s)


Row 13, repeat Row 12

Change color
Row 14, repeat Row 10


Row 15, repeat Row 14

 Change color
Row 16, repeat Row 12

Row 17, repeat Row 16

Change color
Row 18, and Row 19, ch 1, work 1 hdc in each st to end of the round, sl st to join (48 hdc)

Please note you can make your hat longer than I did, just add more rows.

Begin hat ribbed edging, using dc

Row 20, ch 1, work 1 dc into each hdc of the round, sl st to join, the join will be in the top of the 1st dc of this round (48 dc)

Row 21, ch 1, work 1 dc into first dc, work 1 fpdc around the next dc, *work 1 dc into the next dc, work 1 fpdc around the next dc* repeat from *to* to end, sl st to join, the join will be in the top of the 1st dc of this round (48 dc)

Final row of hat, once again you make this longer.

Row 22, work 1 hdc into each dc to the end, (48 hdc), sl st to join and finish off leaving a long enough tail to sew in and hide your ends.


Free Pattern Courtesy Of Cat Wood
Aka, Cats-Rockin-Crochet.
 Jan 2014.

You can sell your items made from this pattern
I’d love to see this pattern used for charity use
Please link back to this pattern if you use it

Friday, January 31, 2014

Free Crochet Hat Pattern Round Up


This Is A Free Pattern Round Up
All Of My Very Own
Each Free Hat Pattern 
Was Written By Me
And Is Available 
Right Here On My Blog
Free For You To Use
Which One Would You Make And Wear?
Free Pattern Links Provided Below

In no particular order, here are the links


Beret with a simple cable stitch. Free Crochet Pattern here.


Ripple Stitch Hat. Free Crochet Pattern Here

Beret with a simple cross stitch. Free Crochet Pattern Here

(2 Free Patterns) Chunky Beret and 
Three Season's Beret. Free Crochet Pattern Here

Crochet Tezzie Hat. Free Crochet Pattern Here
  
Crochet Crocodile Stitch Hat. Free Crochet Pattern Here

Crochet Catherine Wheel Hat. Free Crochet Pattern Here

Which Stitch Hat. Free Crochet Pattern Here.

If I was to pick a hat that I am most proud of, I would say it is the Catherine Wheel Stitch, hat pattern. It not only has my name, but it was a challenge and a pleasure to make it work.
Hope you like my little round up here and thank you to my readers for all of your positive and generous feed back!


It's A Goal, Crochet Net Ball Hat


My step daughter Bek asked me to make her a hat in the form of a netball. My answer was, that I would have to do some research and see what I can come up with.
I haven't touched a netball in years so I scanned the internet for netball images as part of my research.

And here is the design I came up with.
A netball shot for a goal.

Below is an image I used to assist with the black lines of the ball. Netball twirling.


This little charm really gave me the idea for the look of the hat.
I had some yarn that was close to a netball color.

I gave the hat a ribbed cuff.
More detailed instructions at the bottom of the post
I used a 4.00mm hook
8 ply yarn.
1 50gm ball of orange, small amount of black and white.
I began with 12 dc in a ring and incresed in each round with the formula below.
12=24=36=48=60=72
I then worked 6 rows around in dc with out increasing.

I changed to black yarn for the ribbed cuff and alternated fpdc, bpdc for 3 rounds, then finished the hat.
fpdc= front post double crochet
bpdc= back post double crochet

Using the picture of the netball twirling I began to sew the lines into the hat.

Not a perfect job, but close enough, my sewing skills are limited.

I had some thick white medium for the hoop of the goal.
Or you could crochet a white, single crochet foundation chain that fits around the hat.


I attached the white yarn to the hoop with a slip st.
Chained 8, sc around the hoop, chained 8 sc around the hoop repeated this in an even manner and joining to the beginning sl st, about 16 ch 8 loops in total.
I then sl st to the centre of the first ch 8,
ch 8, sc into the 4th chain of the next ch 8, continuing around to where I first sl st into the ch 8.
I did 2 more rows of the chain and finished off the goal netting.
Wear the net on, or wear the net off, it's up to you, but I know that my step daughter will be wearing this hat whilst playing netball and the net may get into her way.
You can always sew it on if you like.

To make the basic hat.
US crochet terms used.
beginning ch 3 is the first dc of the round
r1. Ch 4, work 11 dc into 1st ch of ch 4, sl st to top of ch 3 to join ring (12 dc)
r2. ch 3 and work 1 dc in same place as ch 3, work 2 dc in each dc around, sl st to top of ch 3 to join,
( 24 dc)
r3. ch 3, work 2 dc in next dc, *work 1 dc in next dc, work 2 dc in next dc* repeat from *to* around sl st to join. ( 36 dc)
r4. ch 3, work 1 dc in the next dc, work 2 dc in the next dc, *work 1 dc in the next 2 dc, work 2 dc in next dc,* repeat from *to* around, sl st to join ( 48 dc)
r5. ch 3 work 1dc in the next 2 dc, work 2 dc in the next dc, *work 1 dc in next 3 dc, work 2 dc in next dc,* repeat from *to* around, sl st to join (60 dc)
r6. ch 3,work 1 dc in the next 3 dc, work 2 dc in next dc, *work 1 dc in next 4 dc, work 2 dc in next dc,* repeat from *to* around, sl st to join (72 dc)
rnd 7, to rnd 12. (6 rounds) ch 3, work 1 dc in each dc around sl st to join
Change to black yarn.
Work 3 rows as follows.
ch 2 to step up to the row you are beginning, this is not counted as a stitch.
r1. fpdc around ch 3 of row below, bpdc around the dc of the row below, *fpdc around the dc of the row below, bpdc around the dc of the row below,* repeat from *to* sl st to join into the first
fpdc
r2 and r3. (ch 2 to step up to this row) *fpdc around fpdc, bpdc around bpdc* repeat from *to* around, sl st to beginning fpdc to join.
finish off, weave in ends.
Use the above pictures and instructions to decorate your hat.
Special stitches used.
FPDCInstructions: yo, insert hook behind post of stitch (from front to back), yo, pull through, bring up even with last stitch completed, yo, pull through 2 loops, (2 loops on hook), yo, pull through rem 2 lps to complete stitch
BPDCInstructions: yo, insert hook behind post of stitch (from back to front), yo, pull through, bring up even with last stitch completed, yo, pull through 2 loops, (2 loops on hook), yo, pull through rem 2 lps to complete stitch