
Printable pattern without pictures, free crochet pattern

To fit 1 yr old (size 2 available soon)
Sweater has a ¾ length
flared sleeve, replace the trbl with a dc, for non flared sleeve
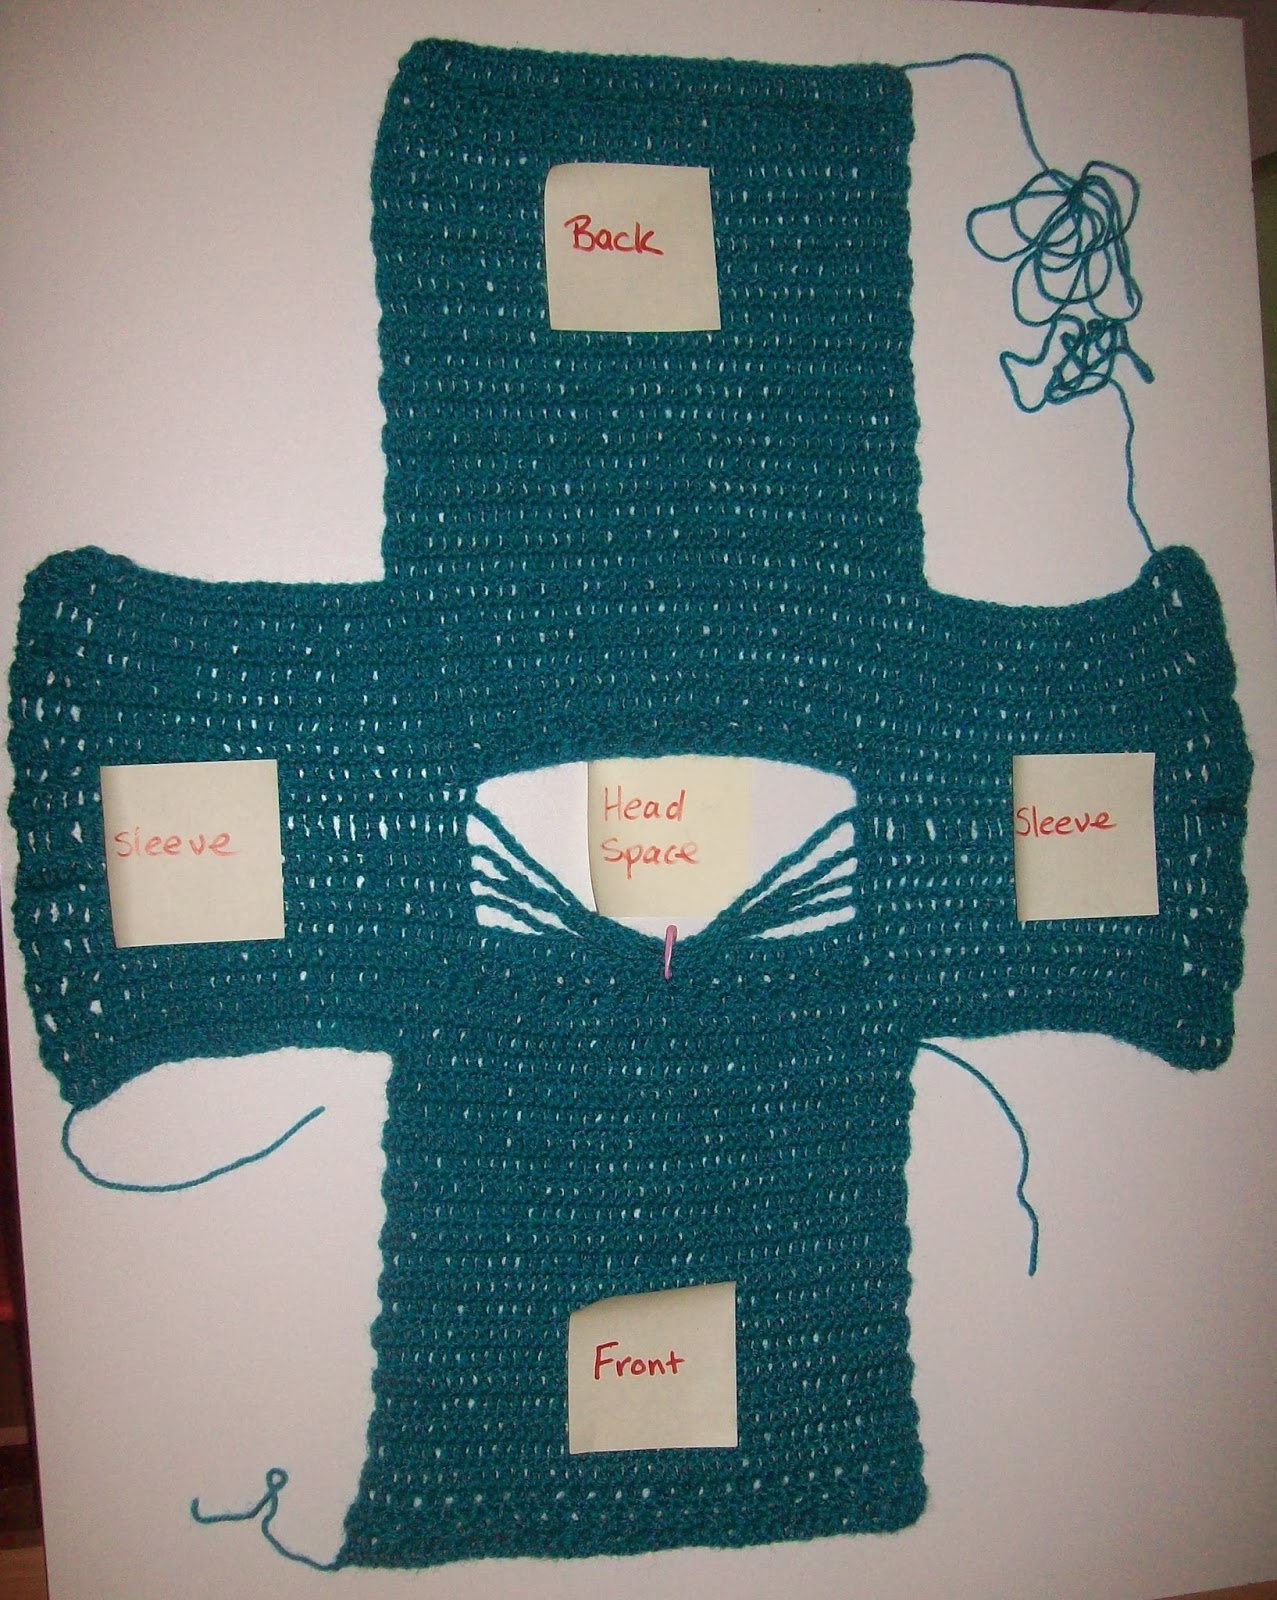
Measurements: see picture, the measurements can be slightly flexible

US terms used
Materials needed:
Hook size: 4.00mm US G/6
Yarn: 8 ply approx 150 gm’s US DK/Medium
Sewing needle
Stitches
used:
Ch= chain
Sc = single crochet
Scfr = single crochet foundation row
Dc = double crochet
Fpdc= front post double crochet
Bpdc = back post double crochet
Trbl = triple crochet
Skill level: beginner +
Tension: medium
Time: approx 6 hours
Introduction: Do you love those crocheted garments
that are made all in one piece with just a little bit of sewing to finish the
garment off? Well this is one of those.

Construction details: Begin at the bottom front
band, work your way up to the sleeve placements, make a chain break off yarn, make another chain and the first row of the sleeve,
then work across the chest part of the sweater and the other chain for the 2nd
sleeve. When you come to the neck and head area, you will replace the st’s with
a length of chain for about 4 rows, and then continue without the chain lengths
working across the sleeve, back and sleeve part. Continue along until the
sleeves are finished, then break off yarn and join to the body only and finish
the back of the sweater. The side seams are then sewn and the lengths of chain
in the neck and head area are gathered and sewn in place, giving this sweater a
little bit of extra decoration, or you can even try to hide them completely!
Let’s begin.
The beginning ch2 or ch3 is not counted as a stitch
throughout pattern.
Row 1, make a scfr of 41 sc. (41 sc)
Row 1, alternative, Ch 42, work 1sc in 2nd
chain from hook and in each ch across (41 sc)
Row 2 ch 2, work 1 dc in each sc to end (41dc)
(Simple rib look edge made over 2 rows)
Row 3 is the right side of the sweater
Row 3 ch 2, work 1 dc in same space of the ch 2,* work
1 fpdc around the next dc, work 1 dc in the next dc* repeat from*to* to end
Row 4 ch 2, work 1 dc in same space of the ch 2,* work
1 bpdc around the next fpdc, work 1 dc in the next dc* repeat from*to* to end
Row 5 ch 2, work 1 dc in each st to the end of the
row, (41 dc)
Row 6 to row 21, ch 2, work 1 dc in each st to the
end of the row, (41 dc)
(Adding sleeves)
Row 22 ch 2 work 1 dc in each st to end, make a
chain of 25, finish off with a sl st and break off yarn, turn you work over,
attach yarn to the last dc of this row, ch 28, turn your work, (you will have a
length of chain coming out from each side of your work
Row 23 work 1 trbl in 4th chain from
hook, work 1 trbl in each of next 3 ch, work 1 dc in each of the next 21 ch,
work 1 dc in each of the next 41 dc, work 1 dc in each of the next 21 ch, work
1 trbl in each of the next 4 ch, ( 4 trbl, 21 dc, 41 dc, 21 dc, 4 trbl) = (91
st’s)
(Row
24 is the right side of the sweater)
Row 24 ch 3, work 1 trbl in the next 4 trbl, work 1
dc in the next 83 dc, work 1 trbl in the next 4 trbl
Row 25 ch 3, work 1 trbl in the next 4 trbl, work 1
dc in each dc across, work 1 trbl in each of the last 4 trbl
Row 26 ch 3, work 1 trbl in the next 4 trbl, work 1
dc in each of the next 30 dc, * work 1 fpdc around the next dc, work 1 dc in
the next dc,* repeat from *to* 10 more times, work 1 fpdc around the next dc,
work 1 dc in each of the next 30 dc, work 1 trbl in each of the last 4 trbl (91
st’s)
Row 27 ch 3, work 1 trbl in the next 4 trbl, work 1
dc in each st to the last 4 trbl, work 1 trbl in each of the next 4 trbl (91 st’s)
(Making the head space)
Row 28 ch 3, work 1 trbl in the next 4 trbl, work 1
dc in each of the next 26 dc, ch 31 (loosely), skip the next 31 st’s, work 1 dc
in each of the next 26 dc, work 1 trbl in each of the next 4 trbl (4 trbl, 30
dc, 31 ch, 30 dc, 4 trbl) = (60 st’s and 31 chain)
Row 29 ch 3, work 1 trbl in the next 4 trbl, work 1
dc in each of the next 26 dc, ch 36 (loosely), work 1 dc in each of the next 26
dc, work 1 trbl in each of the next 4 trbl (60 st’s and 36 chain)
Row 30 ch 3, work 1 trbl in each of the next 30 st’s,
ch 41 (loosely), work 1 trbl in each of the next 30 st’s
Row 31 ch 3, work 1 trbl in the next 4 trbl, work 1
dc in each of the next 26 trbl, ch 46 (loosely), work 1 dc in each of the next 26
trbl, work 1 trbl in each of the next 4 trbl (60 st’s and 46 chain)
Row 32 ch 3, work 1 trbl in the next 4 trbl, work 1
dc in each of the next 26 dc, ch 31 (loosely), work 1 dc in each of the next 26
dc, work 1 trbl in each of the next 4 trbl (60 st’s and 31 chain)
On this row you will be working
into the chain, bringing back the 31 skipped stitches for the head opening
Row 33 ch 3, work 1 trbl in the next 4 trbl, work 1
dc in each of the next 26 dc, work 1 dc in each of the next 31 chain spaces, work
1 dc in each of the next 26 dc, work 1 trbl in each of the next 4 trbl (91 st’s)
Row 34 ch 3, work 1 trbl in the next 4 trbl, work 1
dc in each of the next 30 dc, * work 1 fpdc around the next dc, work 1 dc in
the next dc,* repeat from *to* 14 more times, work 1 fpdc around the next dc,
work 1 dc in each of the next 30 dc, work 1 trbl in each of the last 4 trbl (91
st’s)
Row 35 ch 3, work 1 trbl in the next 4 trbl, work 1
dc in each st to the last 4 trbl, work 1 trbl in each of the next 4 trbl (91 st’s)
Row 36 to Row 41, ch 3, work 1 trbl in the next 4
trbl, work 1 dc in each st to the last 4 trbl, work 1 trbl in each of the next
4 trbl (91 st’s).
We are finished making the sleeves now, break off
yarn and turn your work
Row 42 Skip over the 4 trbl and the next 21 dc, joining
yarn to the 26th st of the row, ch 2, work 1 dc in same space of
join and ch 2, work 1 dc in the next 40 dc, turn (41 dc)
Row 43 ch 2, work 1 dc in each st to the end of the
row, (41 dc)
Row 44 to Row 58, repeat row 43
Row 59 ch 2, work 1 dc in same space of the ch 2,* work
1 bpdc around the next dc, work 1 dc in the next dc* repeat from*to* to end
Row 60 ch 2, work 1 dc in same space of the ch 2,* work
1 fpdc around the next bpdc, work 1 dc in the next dc* repeat from*to* to end
Row 61 ch 2, work 1 dc in each st to the end of the
row, (41 dc)
(Right side of work)
Row 62 ch 1, work 1 sc in each st to end, break off
yarn leaving a long length for sewing
Fold sweater in place with wrong sides facing out,
sew side and sleeve seams together on both sides
With right side facing
Gather the length’s of chains from the head space,
find the middle of the chains, sew the middle part together, then sew to the
outer part of the sweater on the chest area, add a button/ decorative item to
hide the chain join on the sweater.
A big thank you to Kathy Johnson Russell for corrections to row 26.
Here is her finished sweater using
Caron Simply Soft, 4mm (G) hook
She also found the size consistent with a size 1.

Please note that this doll has breast's which elongates the chains.
Here is her finished sweater using
Caron Simply Soft, 4mm (G) hook
She also found the size consistent with a size 1.
Please note that this doll has breast's which elongates the chains.

Free CrochetPattern Courtesy Of Cat Wood
Aka,
Cats-Rockin-Crochet.
Jan 2014.
You can use this pattern for charity or for selling
your work, please link back to this pattern if you use it.


