Showing posts with label scrap crochet. Show all posts

Tuesday, August 6, 2013

Crochet Kokeshi Doll Construction


After making my very first Kokeshi doll
crochet kokeshi doll
 I wanted to make more.
So I did!
I took pictures as I made them and wanted to share them with you.
It's very clever how they come together.
how to crochet a kokeshi doll
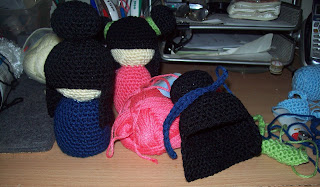
 As you can see I am making 3, this is the body and head made in one piece, these have been stuffed and a small weight placed in the bottom to make them stand up.
crocheting a kokeshi doll
These dolls are your typical amigurumi, made with sc's in the round next was their hair, made separately and placed onto their head.
Then their little back thingies are made, I think they are called an obi.
Then I made their sleeve's and hands, the sleeve is just a basic triangle.
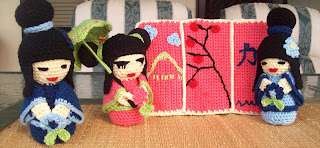
They are really taking shape now, with their hands and sleeves attached it was play time for me, sewing eye's and mouths and little extra features.
I did go on line to get inspiration, I mucked up the pink one's eyes a bit and had to play around with them more, but I achieved a different look with her, I also made up my own little flower and found a pattern for a small umbrella
kokeshi dolls
 I did the screen free hand and am currently thinking on lanterns or small pieces of furniture to finish the setting off.
kokeshi dolls crochet
I'm not sure if I should add a little more bling to their hair, chop sticks and beads.
crochet japanese kokeshi dolls
The main thing is that I had fun!
But I have so many more items I want to crochet I may just leave these ladies the way they are and move onto something else that I have in mind to do, as a matter of fact I have already started a bit of it, thumbs up for crochet!
I found this pattern for the doll using the way back machine, here is the link.

Sunday, February 15, 2009

Off The Hook And Onto The Floor

You'll have to go back in time to appreciate the end result of this rag rug I just finished for my kitchen floor. The original post begins here in early December of 2008. It was a big bag of scrap yarn, the scraps being under 12 inches per piece and some were also a bit longer. When I first began tying the yarn scraps together I was trying to hide the knot, but once I knew what I was going to make with the scraps, I tied them longer. The knots are deliberately all on the one side of the mat, for that real rag rug look. It is just a bit of a shame that the ply was different in some area's causing the rug to look wider on one end. It's all made in simple sc. The yarn was left over from tapestry scraps and it is 100% wool, I also blended this with a carpet nylon for extra strength and durability.
Little Rev, likes my mat too.
Below is a preview of the face cloths that are slowly building up for our fire victims.

Wednesday, December 17, 2008

Scrap Yarn Recycled

Remember the big bag of scrap yarn that was rescued for me?
Well this is how much of it is left so far.


I'm not sure if I would have gotten around to this as quick as I have if it was not for my recent head injury which required 14 st's and gave me concussion. It was best for me to just sit and not do too much, which kept the nausea and pain at a distance.
So here I have the result of knotting and winding the yarn into use-able balls. They each weigh about 50gm's a ball, I used the small digital scales and guess work to get them to around the same size.

The scrap bits of yarn that were way too small, have made it into one of my scrap yarn vase's, which will be used for decoration until I decide to felt it later on.

Tuesday, December 16, 2008

My Yarn Scraps

My yarn scraps are growing, these are just from cut off ends or yarn not worth the rescue. You can view the original post here. There is also some links for scrap yarn projects.

This is my first jar I filled.

Thursday, August 28, 2008

My Happy Hippy Crochet Scrap Vest

a crochet vest from scrap yarn
I made this vest from lots of scrap yarn that I had and the trimming is made from a yarn I was given by Stramenda from the crochet lovers group on ravelry.

Firstly I had to come up with some sort of plan to go by, so I drew one up, but I did alter it as I went along and below is the final plan I used for my vest. It is made in one complete piece.
Here you can see how it has come along, I crocheted it so the stripes were vertical. Following this stage, I sewed the front shoulder parts to the back, sewed in all the loose ends and used the same yarn to crochet around the vest for a nice edging.


No body was home to help me take pictures. So here I am modeling my new vest.
And a side view.

The big bold leather buttons really make a statement. They were a part of my dear departed mother in laws button stash, I'm so glad I got to use them, we think they may have been of one of my dear departed father in laws jackets.

Not wanting the front of the vest to sag or gape when buttoned, I actually sewed the front of the vest together, over lapping one side under the other and it fits very well over my head and hangs nicely to my shape.

The moral here is, keep those scraps you have, there is always something to be made from them.

Thursday, August 7, 2008

A visit from the grandkids

I had a lovely visit from my grandsons tonight, it gave me the opportunity to try the pink pussy hat on for size, I chased Cooper (2 yrs) around to get him to try it on, but he would not have a bar of it, so I picked on Brady (5 mths) it was a little too big for him so I would say the hat would fit a 4 to 5 yr old.

Cooper is wearing the first spiderman hat I made, this one does not even fit Pa, it is way too big, but Cooper likes to wear it over his face and crawl around on all fours being spiderman. If you look close you will see he has also put on Nanny's out door thongs (flip flops). Trying to fit into my shoes already.
My daughter (Cristy) brought me over this jar and asked if I might be able to use it, my other daughter (Danielle) said "what more clutter", I had an idea immediately.
I've been saving my scrap yarn for months to felt and roll into balls and then into a necklace, I really stuffed them into the jar and I think the effect looks great.
You can also roll newspaper into the balls for a necklace too.