STRAWBERRY FIELDS CHOCOLATE CUP CAKE
Take some real enjoyment from this sweet little treat!
No calories, lot's of fiber and a visually delightful cup cake.
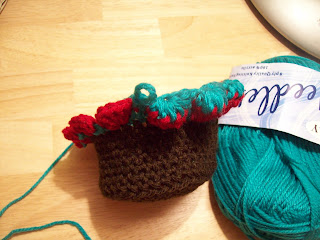
The cup cake is made from the bottom and upwards. It begins with making a circle as the base, 1 round of working into the back loops to raise the cake, several rounds to make the cake taller, 3 rounds to make the strawberry surrounds, 1 round for the dollop of cream, then a few more rounds to close the top of the cake.
Chocolate brown yarn is used for the cup cake, red and green for the strawberry rounds and white is used for the dollop of cream and the lid of the cake.
Ingredients required:
Please note that using thinner or thicker yarn and hook size will change the size of your cupcake. Make it big or go small. These materials will give you a medium size.
Yarn, 8 ply (dk) choc brown 5 oz, small amounts of green, red and white 5 oz
Crochet hook, 4 mm
Stuffing of your choice (see below for stuffing tips)
Stitch marker
Scissors and sewing needle
Stitches used:
Sl st = slip stitch
Ch = chain
Dec = decrease
Blo = back loop only
Sc = single crochet
Hdc = half double crochet
Dc = double crochet
Oz = ounce
Special stitches used:
Cluster st = unfinished hdc = yarn over hook, insert hook into st and pull out a loop. This technique will be used 1 time in each of the next 5 st's to close the strawberry and make it pop out.
Full instructions, yarn over hook, insert hook into 1st dc and pull out a loop (3 loops on hook), yarn over hook, insert hook into 2nd dc and pull out a loop (5 loops on hook), yarn over hook, insert hook into 3rd dc and pull out a loop (7 loops on hook), yarn over hook, insert hook into 4th dc and pull out a loop (9 loops on hook), yarn over hook, insert hook into 5th dc and pull out a loop (11 loops on hook), yarn over and pull through all loops on hook, ch 1 to close
Time to make: for your first one, about 2 hours, the more you make the quicker they become.
Please read notes and special instructions before making pattern
First step, you can use a magic ring or ch 4 and sl st to join to make your ring (your choice)
These rounds are not joined
Round 1. work 6 sc's into ring (place marker after each round)
Round 2. work 2 sc's into each sc (12 sc)
Round 3. Work 1 sc into 1st sc, work 2 sc into next sc, *work 1 sc into next sc, work 2 sc into next sc* repeat from *to* to end (18 sc)
Round 4. Work 1 sc into each of the next 2 sc's, work 2 sc into next sc, *work 1 sc into each of the next 2 sc's, work 2 sc into next sc* repeat from *to* to end (24 sc)
Round 5. Work 1 sc into each of the next 3 sc's, work 2 sc into next sc, *work 1 sc into each of the next 3 sc's, work 2 sc into next sc* repeat from *to* to end (30 sc)
Round 6. Work 1 sc into each of the next 4 sc's, work 2 sc into next sc, *work 1 sc into each of the next 4 sc's, work 2 sc into next sc* repeat from *to* to end (36 sc)
Base complete, now lets make the cake rise, this round has no increases, but each stitch is worked into the back loop of of every sc of the round
Round 1. work 1 sc in each stitch to end (back loops only)
Round 2. (working in both loops) work 1 sc into each sc to end
Repeat row 2 until cake measures approx 1 and a half inches high, this will be about 8 to 10 rounds, break off choc brown yarn and begin next row with green.
Begin strawberry rounds.
Working with green make a sl st into the same space as you ended the brown
Round 1. with green, ch 1, work 1 sc into each sc to end, sl st to join round (36 sc)
Round 1. with green, ch 1, work 1 sc into each sc to end, sl st to join round (36 sc)
NOTE for round 2: always carry the yarn that is not in use.
Round 2. ch 1, *work 1 sc into each of the next 2 sc's, using red, work 5 dc into the next sc*, repeat from *to* to end, to join, sl st into first sc of the round with the GREEN, finish off red leaving a tail of the red to sew in and secure, (12 groups of 5 dc, 12 groups of 2 sc)
Round 2. ch 1, *work 1 sc into each of the next 2 sc's, using red, work 5 dc into the next sc*, repeat from *to* to end, to join, sl st into first sc of the round with the GREEN, finish off red leaving a tail of the red to sew in and secure, (12 groups of 5 dc, 12 groups of 2 sc)
Round 3. ch 1, *work 1 sc into each of the next 2 sc's, work the cluster st (as per instructions) over the next 5 dc* repeat from *to* to end, sl st to join, end green (24 sc, 12 ch 1 spaces)
Working with white make a sl st into the same space as you ended the green
Round 1. ch 1, *work 1 sc into each of the next 2 sc's, work 1 sc into the ch 1 space* repeat from *to* to end, sl st to join (36 sc)
Dollop of cream round
Round 2. ch 1, *work 1 sc into each of the next 2 sc's, work 5 dc's into the next sc, turn your work, work 1 sc into the 5th dc from your hook, turn your work* repeat from *to* to end, sl st to join (36 sc)
Closing the lid, decrease rounds
Round 3. ch 1 *work 1 sc into each of the next 4 sc's, work the next 2 sc together (dec made)* repeat from *to* to end, sl st to join (30 sc)
Round 4. ch 1 *work 1 sc into each of the next 3 sc's, work the next 2 sc together (dec made)* repeat from *to* to end, sl st to join (24 sc)
Round 5. ch 1 *work 1 sc into each of the next 2 sc's, work the next 2 sc together (dec made)* repeat from *to* to end, sl st to join (18 sc)
Now would be a good time to start stuffing your cup cake, once stuffed and shaped, continue onto next round
Round 6. ch 1 *work 1 sc into the next sc, work the next 2 sc together (dec made)* repeat from *to* to end, sl st to join (12 sc)
Round 7. ch 1 *work 2 sc together* repeat from *to* to end, sl st to join (6 sc), break off yarn leaving a tail to weave the remaining st's closed, sew in and hide ending tail.
Congratulations, you have now finished your cup cake.
To make your cupcake look extra delicious you can add a strawberry to the top, a heart applique, an extra dollop of cream or create something you really fancy.
For the heart applique, I used my super quick, 2 round free crochet heart pattern that you can find here.
For the strawberry, I watched this video tutorial, or you can do a search for a written, free crochet strawberry pattern.
I also watched this video tutorial on how to make the strawberry stitch pattern that gave me the idea to place the strawberry field on a cup cake. I did change it a bit to suit the cupcake, but it will give you a good idea of how I made the strawberry.
My Big Tip
I was super excited about my re-purposed stuffing! I had washed and dried some old pillows, cut the corner out of the pillow cover and just reached in and pulled out perfect stuffing! I have some old cushions I plan to do this to as well. A big bag of shop bought stuffing is not cheap, so I saved $'s by doing it this way.
Anyhow, I hope you have enjoyed this fun and cute cupcake pattern, I've been making these and more sweets for the Mothers Day stall at my granddaughters school and I'm so happy to get a little time in for crocheting once again!


