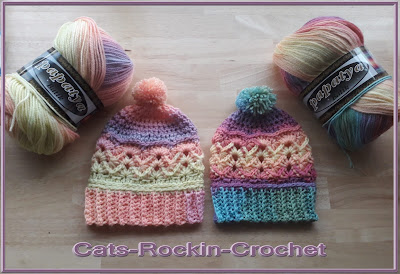
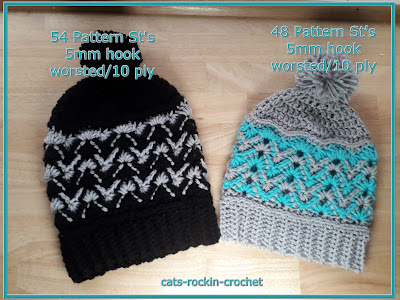
The "Slip n Slide" hat pattern is very decorative and repetitive to make. It has a pattern stitch count of 6 and can be made in many sizes. I would also class this hat as a unisex design, the yarn color that you use will determine your choice for a male or females hat.
The construction of the pattern is made up of a shell which is 3 dc, ch 3, 3 dc. After the set up round, you will continue with the shells that have a cluster in between each shell, that cluster is made with the 3 dc's of one half of the shell and 3 dc's of the other half of the next set of shells. This stitch pattern is easily compared to the chevron/zigzag crochet patterns.
If you would like to print this pattern, scroll down to the bottom of the page then copy the pattern and paste to a word document.
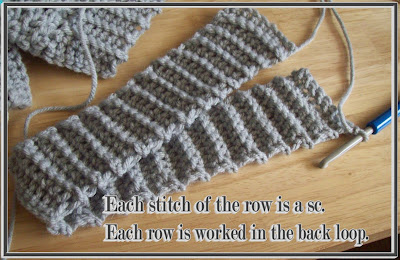
The hat begins at the bottom, which is made in a strip, then joined to form a circle.If you would like to print this pattern, scroll down to the bottom of the page then copy the pattern and paste to a word document.
This hat can be made in many sizes, from new born to large adult using a stitch count in multiples of 6.
You can also use a thicker yarn and larger hook.
Once the band has been made and joined for the size of your hat, the 1st and 2nd rows of the body of your hat will be adjusted for the pattern stitch count.
Suggested Materials needed:
8 ply/DK Light Worsted
4mm/G-6
Stitches used:
ch = chain
sc = single crochet
back loop
hdc = half double crochet
dc = double crochet
dec = decrease
inc = increase
yo = yarn over
bpdc = back post double crochet
Special Stitches:
Shell st = 3 dc, ch 3, 3 dc all in the same space
Cluster = make a bpdc cluster with the next 6 dc of the row below.
All the cluster stitches are made by going into the st from the back to the front (back post dc).
You will, yo hook insert hook from the back to the front and draw up a loop, yo and draw through 2 loops (2 loops on hook), repeat for the next 5 dc's, you will have 7 loops on your hook, yo and pull through all loops, cluster made.
Please Use The Guide Below
To Make The Pattern For Your
Selected Size.
The band will need to be a Few rows shorter than the pattern stitch count as the band will need to stretch.
To Begin:
Make the band/brim
Ch 9
Row 1. work 1 sc in 2nd ch from hook and in each ch across, ch 1 and turn (8sc)
Row 2. work 1 sc into the back loop of each sc, ch 1 and turn (8sc)
continue working row 2 until you have approx 46 rows.
Make the band/brim
Ch 9
Row 1. work 1 sc in 2nd ch from hook and in each ch across, ch 1 and turn (8sc)
Row 2. work 1 sc into the back loop of each sc, ch 1 and turn (8sc)
continue working row 2 until you have approx 46 rows.
Last row of the band and joining the band video.
Join band into a circle.
Leave yarn attached, ch 1 and sl st to join using the back loops
of the last row made and the unworked loops of the beginning chain row.
TIP: Do not join too tight as it may pucker.
The first row around the hat edge and where to place your stitches
Round 1: Ch 1, work 1 hdc in each row end to end, sl st to join round.
Make your increases or decreases evenly in round 2
Round 2: Ch 1, work 1 hdc in the back loop of each hdc or the round, sl st to join round. (your count should be in multiples of 6)
Pattern Set Up Round 3
Pattern Set Up Round:
Round 3: Ch 3, work 2 dc, ch 3 and 3 dc in same st of the ch 3, skip 2 st's, work 1 sc in next st, *skip 2 st's, work the shell st in next st, skip 2 st's, work 1 sc in next st, skip 2 st's* repeat from *to* to end of round. Join all pattern rows like this, loosely sl st into the next 3 st's and into the ch 3 space.
Pattern Round:
Pattern Round 4. Part 1 Cluster st Explained
Round 4: Ch 3, work 2 dc, ch 3 and 3 dc in same st of the ch 3, *work (Special Stitch, Cluster) the bpdc cluster with the next 6 dc's, work the shell st in the ch 3 space* repeat from *to* to end of round, join round.
Pattern Round 4. Part 2
Rounds 5 and on, repeat Round 4 until the height of your hat almost reaches your crown. Do not sl st to the ch 3 space, make the sl st into the top of the ch 3.
The next rounds made, will give the hat a straight edge again.
Making the crown:
Round 1: ch 1, work a hdc in the top of the ch 3, work 1 hdc in the next dc, hdc the next dc and the ch 3 space of the shell together, work 1 hdc in each of the next 2 dc, hdc the next dc and the top of the cluster together, (you will have made 6 hdc's) *work 1 hdc into each of the next 2 dc, hdc the next dc and the ch 3 space of the shell together, work 1 hdc in each of the next 2 dc, hdc the next dc and the top of the cluster together* repeat from *to* to join, sl st into the top of the beginning hdc st. (your stitch count will be in multiples of 6)
Round 2: ch 1, (work all st's in to the back loop of the hdc's) work 1 hdc in the back loop of each hdc of the round, to join, sl st into the top of the beginning hdc st.
Begin decreases: For a baby, toddler hat complete the crown with the hdc st, for adult sizes complete the crown with the dc st.
For the purpose of this pattern, I will write the hdc st, please adjust this to a dc for the adult size hats and work a ch 2 at the beginning of the round, but do not count that ch 2 as a stitch.
Round 1:
Round 2:
For the purpose of this pattern, I will write the hdc st, please adjust this to a dc for the adult size hats and work a ch 2 at the beginning of the round, but do not count that ch 2 as a stitch.
Round 3: ch 1, *work 1 hdc in the next 4 st's, hdc the next 2 st's tog* (decrease made) repeat from *to* to end of round,
to join, sl st into the top of the beginning hdc st.
Round 4: ch 1, *work 1 hdc in the next 3 st's, hdc the next 2 st's tog* (decrease made) repeat from *to* to end of round,
to join, sl st into the top of the beginning hdc st.
to join, sl st into the top of the beginning hdc st.
Round 5: ch 1, *work 1 hdc in the next 2 st's, hdc the next 2 st's tog* (decrease made) repeat from *to* to end of round,
to join, sl st into the top of the beginning hdc st.
TIP: If you want a messy bun hat, finish off your hat here or the next round.
Round 6: ch 1, *work 1 hdc into the next st, hdc the next 2 st's tog* (decrease made) repeat from *to* to end of round,
to join, sl st into the top of the beginning hdc st.
to join, sl st into the top of the beginning hdc st.
Round 7: ch 1, *hdc the next 2 st's tog* (decrease made) repeat from *to* to end of round, to join, sl st into the top of the beginning hdc st. Break off yarn leaving a long tail to sew the remaining hole of the crown closed and weave in ends.
*COPY AND PASTE ME, THEN PRINT THE PATTERN*
To Begin:
Make the band/brim
Ch 9
Row 1. work 1 sc in 2nd ch from hook and in each ch across, ch 1 and turn (8sc)
Row 2. work 1 sc into the back loop of each sc, ch 1 and turn (8sc)
continue working row 2 until you have approx 46 rows.
Make the band/brim
Ch 9
Row 1. work 1 sc in 2nd ch from hook and in each ch across, ch 1 and turn (8sc)
Row 2. work 1 sc into the back loop of each sc, ch 1 and turn (8sc)
continue working row 2 until you have approx 46 rows.
Join band into a circle.
Leave yarn attached, ch 1 and sl st to join using the back loops
of the last row made and the unworked loops of the beginning chain row.
TIP: Do not join too tight as it may pucker.
Round 1: Ch 1, work 1 hdc in each row end to end, sl st to join round.
Make your increases or decreases evenly in round 2
Round 2: Ch 1, work 1 hdc in the back loop of each hdc or the round, sl st to join round. (your count should be in multiples of 6)
Pattern Set Up Round:
Round 3:
Ch 3, work 2 dc, ch 3 and 3 dc in same st of the ch 3, skip 2 st's,
work 1 sc in next st, *skip 2 st's, work the shell st in next st, skip 2
st's, work 1 sc in next st, skip 2 st's* repeat from *to* to end of
round. Join all pattern rows like this, loosely sl st into the next 3
st's and into the ch 3 space.
Pattern Round:
Pattern Round:
Round 4: Ch 3, work 2 dc, ch 3 and 3 dc in same st of the ch 3, *work (Special Stitch, Cluster) the bpdc cluster with the next 6 dc's, work the shell st in the ch 3 space* repeat from *to* to end of round, join round.
Rounds 5 and on, repeat Round 4
until the height of your hat almost reaches your crown. Do not sl st to
the ch 3 space, make the sl st into the top of the ch 3.
The next rounds made, will give the hat a straight edge again.
Making the crown:
Round 1: ch 1, work
a hdc in the top of the ch 3, work 1 hdc in the next dc, hdc the next
dc and the ch 3 space of the shell together, work 1 hdc in each of the
next 2 dc, hdc the next dc and the top of the cluster together, (you
will have made 6 hdc's) *work 1 hdc into each of the next 2 dc, hdc the next dc and the ch 3 space of the shell together, work
1 hdc in each of the next 2 dc, hdc the next dc and the top of the
cluster together* repeat from *to* to join, sl st into the top of the
beginning hdc st. (your stitch count will be in multiples of 6)
Round 2: ch 1, (work all st's in to the back loop of the hdc's) work 1 hdc in the back loop of each hdc of the round, to join, sl st into the top of the beginning hdc st.
Begin decreases: For a baby, toddler hat complete the crown with the hdc st, for adult sizes complete the crown with the dc st.
For
the purpose of this pattern, I will write the hdc st, please adjust
this to a dc for the adult size hats and work a ch 2 at the beginning of
the round, but do not count that ch 2 as a stitch.
Round 3: ch 1, *work 1 hdc in the next 4 st's, hdc the next 2 st's tog* (decrease made) repeat from *to* to end of round,
to join, sl st into the top of the beginning hdc st.
Round 4: ch 1, *work 1 hdc in the next 3 st's, hdc the next 2 st's tog* (decrease made) repeat from *to* to end of round,
to join, sl st into the top of the beginning hdc st.
to join, sl st into the top of the beginning hdc st.
Round 5: ch 1, *work 1 hdc in the next 2 st's, hdc the next 2 st's tog* (decrease made) repeat from *to* to end of round,
to join, sl st into the top of the beginning hdc st.
TIP: If you want a messy bun hat, finish off your hat here or the next round.
Round 6: ch 1, *work 1 hdc into the next st, hdc the next 2 st's tog* (decrease made) repeat from *to* to end of round,
to join, sl st into the top of the beginning hdc st.
to join, sl st into the top of the beginning hdc st.
Round 7: ch 1, *hdc the next 2 st's tog* (decrease made) repeat from *to* to end of round, to
join, sl st into the top of the beginning hdc st. Break off yarn
leaving a long tail to sew the remaining hole of the crown closed and
weave in ends.


