Friday, January 1, 2016

Crochet A Peace Sign Shoulder Bag


             Crocheted, Peace Sign Shoulder Bag


crochet peace sign

This crochet peace sign bag is made for fun!
The peace sign shoulder bag is made with the single crochet stitch which eliminates the need for a bag lining.
The bag can be made using any yarn ply and the recommended crochet hook size for that ply.
The thicker the ply, the larger your bag squares will be.

The bag consists of 2 peace sign squares and a shoulder strap that is sewn onto and around the squares. 
You will need to know how to carry the yarn that is not in use to perfect the peace sign.
The instructions given are for a row count from a graph.
Materials required, yarn hook, sewing needle and scissors.

Time, a leisurely 4 hours
Experience, intermediate
Stitches Used, ch, sc, sl st, hdc
The main color will only be referred to as m and the alternating color will only have a number, giving an example from row 3 of the pattern, it will read, 

Row 3. 9m, 9, 9m, ch 1 and turn, 
which means: work 9 sc in the next 9 sc with the main color, work 9 sc in the next 9 sc with the alternating color, work 9 sc in the next 9 sc with the main color, ch 1 and turn, I do believe the short hand instructions will make this easier to read.

I used the peace graph sign from this source then I added 2 rows to the beginning and end, then 2 extra st's on both sides.

#peace graph sign

#crochet

#crochet

Within the instructions, I have underlined the center st's as the end st's are a mirrored version of the beginning st's.
Lets begin.
Make a chain of 28
Row 1. skip the 1st chain and make 1 sc into each of the next 27 ch, ch 1 and turn (27 sc)
Row 2. work 1 sc into each sc to end, ch 1 and turn
Now begin with the short hand instructions.

Row 3.  9m, 9, 9m, (you will always ch 1 and turn at the end of every row)
Row 4.  7m, 13, 7m
Row 5.  5m, 4, 3m, 3, 3m, 4, 5m
Row 6.  4m, 3, 5m, 3, 5m, 3, 4m
Row 7.  4m, 2, 6m, 3, 6m, 2, 4m
Row 8.  3m, 3, 6m, 3, 6m, 3, 3m
Row 9.  3m, 4, 5m, 3, 5m, 4, 3m
Row 10. 2m, 2, 1m, 3, 4m, 3, 4m, 3, 1m, 2, 2m
Row 11. 2m, 2, 2m, 3, 3m, 3, 3m, 3, 2m, 2, 2m
Row 12. 2m, 2, 3m, 3, 2m, 3, 2m, 3, 3m, 2, 2m
Row 13. 2m, 2, 4m, 3, 1m, 3, 1m, 3, 4m, 2, 2m
Row 14. 2m, 2, 5m, 9, 5m, 2, 2m
Row 15. 2m, 2, 6m, 7, 6m, 2, 2m
Row 16. 2m, 2, 7m, 5, 7m, 2, 2m
Row 17. 2m, 2, 8m, 3, 8m, 2, 2m
Row 18. 2m, 2, 8m, 3, 8m, 2, 2m
Row 19. 2m, 2, 8m, 3, 8m, 2, 2m
Row 20. 3m, 2, 7m, 3, 7m, 2, 3m
Row 21. 3m, 3, 6m, 3, 6m, 3, 3m
Row 22. 4m, 2, 6m, 3, 6m, 2, 4m
Row 23. 4m, 3, 5m, 3, 5m, 3, 4m
Row 24. 5m, 4, 3m, 3, 3m, 4, 5m
Row 25. 7m, 13, 7m
Row 26. 9m, 9, 9m


Your peace sign is complete and there is no need to carry your 2nd color
Rows 27 and 28. with main color, work 1 sc into each sc to end
break off yarn leaving a tail to sew in later on.
Make the 2nd square. My squares were approx 8 inches using a 10 ply with the black bag.

Sew in the tails of the contrasting yarn on both squares, do not sew in the beginning and ending strands of the square at this point in time.

Begin the strap, which will form the bottom the sides of the bag and the shoulder strap.
Use any color you prefer
Make a chain of 6
Row 1. skip the 1st chain and make 1 sc into each of the next 5 ch (5 sc) always ch 1 and turn
Row 2. make 1 sc into each sc to end (5 sc)
repeat row 2 for a length slightly longer of the side, the bottom and the other side of your square, do not break off yarn.


Attach row 1 of the unfinished shoulder strap to row 28 of the square with a sl st and contuniue to join strap to square with evenly placed sl st's along the side, the bottom and up the other side of the square, break off and secure yarn.
Repeat above to attach to the other square.


Your bag should look like the picture above once both sides are joined, undo the extra rows of sc to even it up with the other side and top edges, or alternatively you can go ahead and make a sc shoulder strap/or make a decorative edging then continue on with the shoulder strap.
Otherwise continue making your shoulder strap, working 1 hdc into each of the next 5 sc, ch 1 and turn.
Continue for length desired or a length of approx 30 inches (depending on what type of yarn you use the strap may stretch slightly once in use), sl st or sew finished shoulder strap onto the other side of the bag, sew in all loose ends.
You may notice that the bag looks good inside or outside, so it's your choice which way to have it.


Next you can make a closure tab.

This is achieved by picking up the center 3 st's of the square, work 3 rows of sc, next row make an opening for a button or bead.
To make the hole, work 1 sc, ch 2 or more, skip the next sc, then sc in the 3rd sc.
Next row, work 1 sc, make a sc in the chain place and a sc in the last sc,
Next row, sl st across all st's break off and sew in yarn.
Add your button or bead to close the tab.

Below I have given some tips when making the bag.

Use a hair clip to mark the line you are working on.
Leave the alternating color in the front of your work so it is easy to pick up on the next row.
You can copy and paste the directions below to a word document and print it out for ease of use.


Make a chain of 28
Row 1. sc 27m
Row 2. sc 27m

Row 3.  9m, 9, 9m
Row 4.  7m, 13, 7m
Row 5.  5m, 4, 3m, 3, 3m, 4, 5m
Row 6.  4m, 3, 5m, 3, 5m, 3, 4m
Row 7.  4m, 2, 6m, 3, 6m, 2, 4m
Row 8.  3m, 3, 6m, 3, 6m, 3, 3m
Row 9.  3m, 4, 5m, 3, 5m, 4, 3m
Row 10. 2m, 2, 1m, 3, 4m, 3, 4m, 3, 1m, 2, 2m
Row 11. 2m, 2, 2m, 3, 3m, 3, 3m, 3, 2m, 2, 2m
Row 12. 2m, 2, 3m, 3, 2m, 3, 2m, 3, 3m, 2, 2m
Row 13. 2m, 2, 4m, 3, 1m, 3, 1m, 3, 4m, 2, 2m
Row 14. 2m, 2, 5m, 9, 5m, 2, 2m
Row 15. 2m, 2, 6m, 7, 6m, 2, 2m
Row 16. 2m, 2, 7m, 5, 7m, 2, 2m
Row 17. 2m, 2, 8m, 3, 8m, 2, 2m
Row 18. 2m, 2, 8m, 3, 8m, 2, 2m
Row 19. 2m, 2, 8m, 3, 8m, 2, 2m
Row 20. 3m, 2, 7m, 3, 7m, 2, 3m
Row 21. 3m, 3, 6m, 3, 6m, 3, 3m
Row 22. 4m, 2, 6m, 3, 6m, 2, 4m
Row 23. 4m, 3, 5m, 3, 5m, 3, 4m
Row 24. 5m, 4, 3m, 3, 3m, 4, 5m
Row 25. 7m, 13, 7m
Row 26. 9m, 9, 9m

Row. 27. sc 27m
Row. 28. sc 27m

Saturday, October 17, 2015

No-Sew Eight-Row Baby Booties


My free No-Sew Eight-Row Baby Booties pattern is currently one of the top 50 used patterns at allfreecrochet, if you would like to see and use it your self here is the link. I'd like to thank allfreecrochet for being a great source of free patterns, both crochet and knit. http://www.allfreecrochet.com/…/No-Sew-Eight-Row-Baby-Bootie

Saturday, September 19, 2015

Give An Old Light Shade A Face Lift


crochet an old light shade 
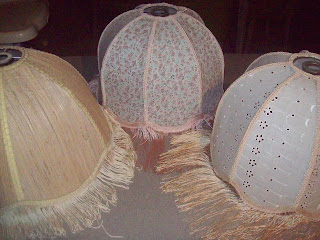
Don't throw those tired old light shades out, they can be be brought back to life with a bit of imagination, a crochet hook and some yarn. Here are three that I plan on working on and I have finished the first one.

crochet an old light shade 2

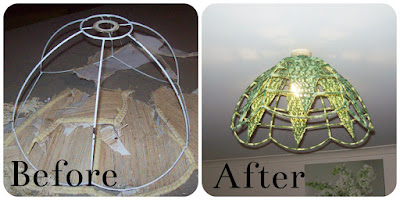
I wanted a simple and open light light shade to go over the dining table.

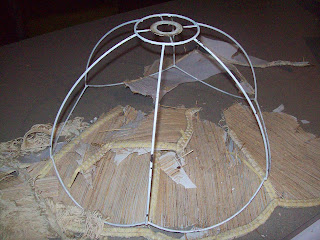
I cut and tore the existing shade off it's frame
crochet an old light shade 3
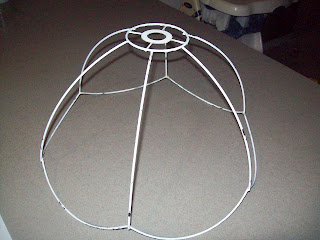
 I then gave it a clean
crochet an old light shade 3
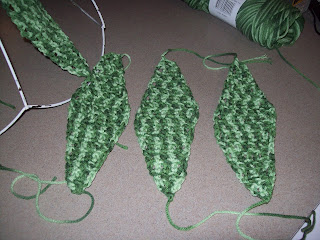
 I crocheted some diamond shapes to fit within each section
crochet an old light shade 4
Then I tied them on at each end
crochet an old light shade 5
I used a budget acrylic yarn
crochet an old light shade 6
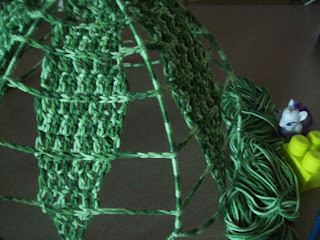
 Next I had to secure the diamond shape with some chains and slip st's, I began at the center of the diamond on the frame, to keep it evenly placed
crochet an old light shade 7
I added more rows of chains and sl st's at an even space
crochet an old light shade 8
Then I began to wrap the exposed frame with a sl st, I used my fingers instead of the crochet hook as it was easier for me
crochet an old light shade 9
I could have added more elements to the light shade, but as I said I wanted something simple.
crochet an old light shade 10
I'm glad I took the time to wrap the exposed frame, the variegated yarn looks quite impressive.
Thanks for taking the time to read my post
I have another light shade I made not long ago if you would like to see that, just follow this link
crochet an old light shade again
 

Sunday, August 9, 2015

I Just Love These Crochet Crocodile Stitch Slippers!


crochet crocodile slipper tutorial

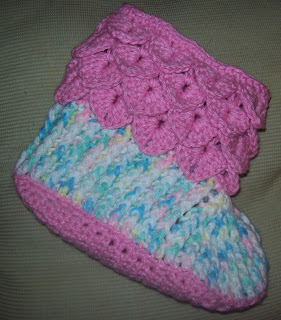
I happened to stumble upon a video tutorial for some really pretty crochet crocodile stitch slippers. It was not just the crocodile stitch that I liked it was the way the slipper was made and formed. It was such a good looking slipper that I had to see how it was made and watched the video's over and over again. I favor visual learning and enjoyed watching the slipper come together, I've made quite a few now and was also inspired to make a baby slipper that was similar.

crochet baby crocodile slippers

With all the slippers I made, I used a 4mm hook and 10 ply yarn.
The Red Heart Aran we have available in Australia is soft and was the perfect yarn choice for these slippers.
The color combo's are limitless!
crochet adult crocodile slipper

crochet crocodile slippers red heart yarn
This pair is for me
crochet crocodile slippers hand made by me
 I used some puff paint for a non slip sole
non slip crochet sole with puff paint

 I couldn't resist to make a baby hat to match the baby slippers.

crochet baby crocodile hat and slippers
You can find the video here or visit Cutie Girl Crochet on facebook

Thank so much Cutie Girl for some pleasurable crochet time.


Sunday, July 26, 2015

Crochet A Light Shade


A very cheap alternative to buying a light shade.
Make one yourself with a small amount of yarn, old beads and an existing light shade.
I chose some woolen yarn and began with a single crochet foundation row
I kept placing it around the light shade until if fit, then joined it into a circle.
To get the round to stay in a circular shape I had to make sure the stitch count was dividable by the number 6.
I did a couple of rounds of sc, then placed a shell st into 6 places.
My stitch count for this was 54, 6 x 9 = 54, so every 9th stitch had a shell st placed into it.
The next round consisted of a sc on each side of the shell st and chains replaced the remaining sc stitches.
My pattern went like this.
1 sc, ch 6, skip 6 sc, 1 sc, make a shell in next st, repeat all the way around then join the round.
The following rounds went like this
1 sc, ch 6, 1 sc, make a shell, repeat all the way around, then join.
The very first thing I did was clean the light shade, then began making the new shade.
I had to block it so it would sit nice, I just used the good old iron.
Then I added some beads from an old necklace, they had their own rings which I hooked through a crochet stitch.

My granddaughter loved it once the beads were added, she now has her own type of chandelier in her bedroom.
Now I know I can do it, I can get more daring and make another even more spectacular!

Sunday, June 7, 2015

DROP STITCH KNITTED, HAT AND HEAD BAND


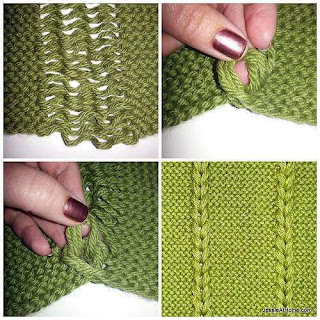
I am really enjoying dropping knitted stitches for that lovely braided effect.
You may have seen my previous post with the dropped and found wrap, I used the very same technique to make a head band and a hat!
Woo Hoo, I'm rockin with the knitting in between caring for my grand kids.
The head band was a no brainer as it was just straight knitting with the garter stitch, I dropped the middle 3 stitches, then braided them with the crochet hook, sewed the ends together and it was perfect!


The hat was more intense, I had to plan it out from beginning to end.
I decided on 4 sets of the dropped st to work evenly around the hat, I knew I had to make the hat on straight needles, I chose to make a baby sized hat and allowed for extra st's that would eventually be dropped.
The 3x3 ribbed edge was the perfect way to begin and I love the look of the braid against the garter stitch.
My original plan was to take the braid all the way to the top of the hat and I was on my way there until I realized that the decreasing would interfere with the dropping of the stitches!
I still believe that the braid can be taken all the way to the top by making the correct calculations
I was not quite sure what the bottom of the band would look like and I was prepared to make adjustments, but once it all came together it looked great!
Then it was onto the finish, decreasing for the crown and sewing it together.
Ta Da!
What do you think?
I love it and it will fit my youngest grandchild called Myles who is 3 months old.
I hope you have found my knitted drop stitch informative and that you may be able to use some of this information for your self.


Saturday, May 30, 2015

Knit The Dropped and Found Wrap


Wow what a clever idea.
This wrap looks awesome!
I'm seriously wondering if I made a hat too big, I could drop the stitches then do this technique to make the hat smaller and give it this lovely look!
dropped stitch technique
Please visit the designer for the free knit pattern which includes a video.

Free Knit Pattern
Easy Skill Level
Designed by Jessie Rayot

free knitting pattern for dropped and found wrap

Saturday, May 9, 2015

Knit Log Cabin Blanket and 10 Stitch Blanket In One!


Using Up My Scrap Yarn
 

log cabin knit blanket
 
Ooh, don't ya feel cozy when it's cold out side and you are making a blanket along with the satisfaction that the yarn you are using is scrap yarn or discontinued yarn or just yarn that you would never have used.
That yarn is going to keep one of the family members nice and toasty this winter.
 
log cabin to 10 stitch blanket

 
This is my first time using the Log Cabin Style in a blanket and I wanted to make it all in one piece, but the larger it got the more pain I felt in my shoulders having to hold up all of those stitches.
So I changed the style to a Log Cabin come 10 Stitch blanket and it is working out fine!

All I did was begin a corner (just after the log cabin cast off) make that corner, then do the 10 st row join into each cast off stitch.

My very first 10 stitch blanket has been well used.
 

10 stitch knitted well used blanket

 
I even made a 15 stitch blanket. 
 
15 stitch blanket using same construction as the knit 10 stitch


I must give credit to Very Pink Knits for her wonderful video tutorials, that taught me how to make both of these styles of knitted blankets.

 Log Cabin Video Tutorial


10 Stitch Blanket Video Tutorial


Thursday, February 26, 2015

KANGA RIDGE SCARF, FREE KNIT PATTERN


The Kanga Ridge Scarf Is A free Knit Pattern
Needless to say, I've had the knitting needles out lately 
(pun intended, lol)
I put these knit stitches together and it came out looking fabulous!
So here I am once again to share a free pattern with you, but this time it is a knitting pattern!
The Kanga Ridge scarf pattern is full of texture and bounce!
This easy knit scarf pattern looks fabulous on both sides too
You can make the scarf with fine to bulky yarn
The pattern is a 2 row repeat, so you will have it memorized in no time!
There is a 3 stitch border on both sides, which stops your scarf from curling in.
Apart from the 3 stitch border, the pattern stitch is based on the rib stitch, purling 1 st, then a knit inc in the next stitch, this is repeated until you get to the next border. 
On the other side of the scarf and after the 3 stitch border, is a k1, then purl 2 together, repeated to the next 3 stitch border. I hope you enjoy this fund and easy scarf pattern.

Stitches used:
K, knit
P, purl
P 2 tog, purl 2 together
K inc, knit increase (knit into the back of the stitch, then knit into the front of the stitch)
Supplies, yarn and needles of your choice
Tension not required

Pattern stitch count is, any number of odd st's plus 6 more st's.

To begin: cast on your st's loosely
Row 1, k 3, p 1, *k inc (see notes), p 1* repeat from *to* to last 3 st's, k 3
Row 2, K 4, *p 2 tog, k 1* repeat from *to* to last 3 st's, k 3

Repeat rows 1 and 2 for length desired, finish with a row 2, then cast off loosely

With my scarf I use a bulky yarn, 15 mm needles, and 19 stitches, the yarn was from my stash and had no label, so I can't tell you what brand it is, sorry.


Free Pattern, Courtesy Of Cathy Wood
Aka, Cats-Rockin-Crochet.
2015.
You can sell your items made from this free knitting pattern
I’d love to see this pattern used for charity use
Please link back to this pattern if you use it

Thursday, January 8, 2015

AllFreeCrochet’s top bloggers of 2014


This is my letter from AllFreeCrochet, I'm so chuffed to say that 2 of my patterns made the list!
My Witch Stitch Hat pattern  
and my One Piece Wonder Baby Bootie pattern.

Please visit their link and show some support for one of the largest collections of free crochet and knit patterns.

Hello!
I’m excited to announce that you’re one of AllFreeCrochet’s top bloggers of 2014! We’ve compiled a list of 100 of our most popular patterns of the year, and you made the cut! One of your patterns is featured on our Top 100 Patterns list, which is live on our site right now.
Here’s the link to our top 100 list, if you’d like to share it with your readers:

Whilst I am here writing this post, I'd like to advise my followers that 5 months ago I became a grandparent raising 2 of my grandchildren ages 9 months and 3 yrs old.
This has been the reason that I have not been active with my free pattern writing and keeping my blog up to date.
My priorities are quite clear, the children come first!
I do however miss my craft so much and will get back into it when time allows. I really do hope that I see you soon, cheers for now and all of my very best to you all!