Saturday, February 6, 2016

Gigi Hadid And Her Fabulous Crocheted Jacket


Gigi Hadid has made a fashion statement by stepping out in a crocheted jacket.
cats-rockin-crochet free crochet patterns
Gigi Hadid crochet jacket free pattern
Her pictures have gone viral in the world of crochet!
Nadia Fuad and YARNutopia now have the free crochet pattern and video tutorial available.
 Thank you for making this available!

Friday, January 1, 2016

Crochet A Peace Sign Shoulder Bag


             Crocheted, Peace Sign Shoulder Bag


crochet peace sign

This crochet peace sign bag is made for fun!
The peace sign shoulder bag is made with the single crochet stitch which eliminates the need for a bag lining.
The bag can be made using any yarn ply and the recommended crochet hook size for that ply.
The thicker the ply, the larger your bag squares will be.

The bag consists of 2 peace sign squares and a shoulder strap that is sewn onto and around the squares. 
You will need to know how to carry the yarn that is not in use to perfect the peace sign.
The instructions given are for a row count from a graph.
Materials required, yarn hook, sewing needle and scissors.

Time, a leisurely 4 hours
Experience, intermediate
Stitches Used, ch, sc, sl st, hdc
The main color will only be referred to as m and the alternating color will only have a number, giving an example from row 3 of the pattern, it will read, 

Row 3. 9m, 9, 9m, ch 1 and turn, 
which means: work 9 sc in the next 9 sc with the main color, work 9 sc in the next 9 sc with the alternating color, work 9 sc in the next 9 sc with the main color, ch 1 and turn, I do believe the short hand instructions will make this easier to read.

I used the peace graph sign from this source then I added 2 rows to the beginning and end, then 2 extra st's on both sides.

#peace graph sign

#crochet

#crochet

Within the instructions, I have underlined the center st's as the end st's are a mirrored version of the beginning st's.
Lets begin.
Make a chain of 28
Row 1. skip the 1st chain and make 1 sc into each of the next 27 ch, ch 1 and turn (27 sc)
Row 2. work 1 sc into each sc to end, ch 1 and turn
Now begin with the short hand instructions.

Row 3.  9m, 9, 9m, (you will always ch 1 and turn at the end of every row)
Row 4.  7m, 13, 7m
Row 5.  5m, 4, 3m, 3, 3m, 4, 5m
Row 6.  4m, 3, 5m, 3, 5m, 3, 4m
Row 7.  4m, 2, 6m, 3, 6m, 2, 4m
Row 8.  3m, 3, 6m, 3, 6m, 3, 3m
Row 9.  3m, 4, 5m, 3, 5m, 4, 3m
Row 10. 2m, 2, 1m, 3, 4m, 3, 4m, 3, 1m, 2, 2m
Row 11. 2m, 2, 2m, 3, 3m, 3, 3m, 3, 2m, 2, 2m
Row 12. 2m, 2, 3m, 3, 2m, 3, 2m, 3, 3m, 2, 2m
Row 13. 2m, 2, 4m, 3, 1m, 3, 1m, 3, 4m, 2, 2m
Row 14. 2m, 2, 5m, 9, 5m, 2, 2m
Row 15. 2m, 2, 6m, 7, 6m, 2, 2m
Row 16. 2m, 2, 7m, 5, 7m, 2, 2m
Row 17. 2m, 2, 8m, 3, 8m, 2, 2m
Row 18. 2m, 2, 8m, 3, 8m, 2, 2m
Row 19. 2m, 2, 8m, 3, 8m, 2, 2m
Row 20. 3m, 2, 7m, 3, 7m, 2, 3m
Row 21. 3m, 3, 6m, 3, 6m, 3, 3m
Row 22. 4m, 2, 6m, 3, 6m, 2, 4m
Row 23. 4m, 3, 5m, 3, 5m, 3, 4m
Row 24. 5m, 4, 3m, 3, 3m, 4, 5m
Row 25. 7m, 13, 7m
Row 26. 9m, 9, 9m


Your peace sign is complete and there is no need to carry your 2nd color
Rows 27 and 28. with main color, work 1 sc into each sc to end
break off yarn leaving a tail to sew in later on.
Make the 2nd square. My squares were approx 8 inches using a 10 ply with the black bag.

Sew in the tails of the contrasting yarn on both squares, do not sew in the beginning and ending strands of the square at this point in time.

Begin the strap, which will form the bottom the sides of the bag and the shoulder strap.
Use any color you prefer
Make a chain of 6
Row 1. skip the 1st chain and make 1 sc into each of the next 5 ch (5 sc) always ch 1 and turn
Row 2. make 1 sc into each sc to end (5 sc)
repeat row 2 for a length slightly longer of the side, the bottom and the other side of your square, do not break off yarn.


Attach row 1 of the unfinished shoulder strap to row 28 of the square with a sl st and contuniue to join strap to square with evenly placed sl st's along the side, the bottom and up the other side of the square, break off and secure yarn.
Repeat above to attach to the other square.


Your bag should look like the picture above once both sides are joined, undo the extra rows of sc to even it up with the other side and top edges, or alternatively you can go ahead and make a sc shoulder strap/or make a decorative edging then continue on with the shoulder strap.
Otherwise continue making your shoulder strap, working 1 hdc into each of the next 5 sc, ch 1 and turn.
Continue for length desired or a length of approx 30 inches (depending on what type of yarn you use the strap may stretch slightly once in use), sl st or sew finished shoulder strap onto the other side of the bag, sew in all loose ends.
You may notice that the bag looks good inside or outside, so it's your choice which way to have it.


Next you can make a closure tab.

This is achieved by picking up the center 3 st's of the square, work 3 rows of sc, next row make an opening for a button or bead.
To make the hole, work 1 sc, ch 2 or more, skip the next sc, then sc in the 3rd sc.
Next row, work 1 sc, make a sc in the chain place and a sc in the last sc,
Next row, sl st across all st's break off and sew in yarn.
Add your button or bead to close the tab.

Below I have given some tips when making the bag.

Use a hair clip to mark the line you are working on.
Leave the alternating color in the front of your work so it is easy to pick up on the next row.
You can copy and paste the directions below to a word document and print it out for ease of use.


Make a chain of 28
Row 1. sc 27m
Row 2. sc 27m

Row 3.  9m, 9, 9m
Row 4.  7m, 13, 7m
Row 5.  5m, 4, 3m, 3, 3m, 4, 5m
Row 6.  4m, 3, 5m, 3, 5m, 3, 4m
Row 7.  4m, 2, 6m, 3, 6m, 2, 4m
Row 8.  3m, 3, 6m, 3, 6m, 3, 3m
Row 9.  3m, 4, 5m, 3, 5m, 4, 3m
Row 10. 2m, 2, 1m, 3, 4m, 3, 4m, 3, 1m, 2, 2m
Row 11. 2m, 2, 2m, 3, 3m, 3, 3m, 3, 2m, 2, 2m
Row 12. 2m, 2, 3m, 3, 2m, 3, 2m, 3, 3m, 2, 2m
Row 13. 2m, 2, 4m, 3, 1m, 3, 1m, 3, 4m, 2, 2m
Row 14. 2m, 2, 5m, 9, 5m, 2, 2m
Row 15. 2m, 2, 6m, 7, 6m, 2, 2m
Row 16. 2m, 2, 7m, 5, 7m, 2, 2m
Row 17. 2m, 2, 8m, 3, 8m, 2, 2m
Row 18. 2m, 2, 8m, 3, 8m, 2, 2m
Row 19. 2m, 2, 8m, 3, 8m, 2, 2m
Row 20. 3m, 2, 7m, 3, 7m, 2, 3m
Row 21. 3m, 3, 6m, 3, 6m, 3, 3m
Row 22. 4m, 2, 6m, 3, 6m, 2, 4m
Row 23. 4m, 3, 5m, 3, 5m, 3, 4m
Row 24. 5m, 4, 3m, 3, 3m, 4, 5m
Row 25. 7m, 13, 7m
Row 26. 9m, 9, 9m

Row. 27. sc 27m
Row. 28. sc 27m

Saturday, October 17, 2015

No-Sew Eight-Row Baby Booties


My free No-Sew Eight-Row Baby Booties pattern is currently one of the top 50 used patterns at allfreecrochet, if you would like to see and use it your self here is the link. I'd like to thank allfreecrochet for being a great source of free patterns, both crochet and knit. http://www.allfreecrochet.com/…/No-Sew-Eight-Row-Baby-Bootie

Saturday, September 19, 2015

Give An Old Light Shade A Face Lift


crochet an old light shade 
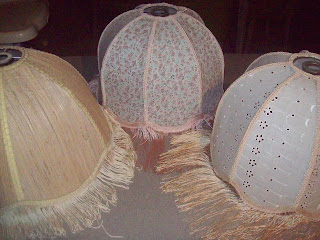
Don't throw those tired old light shades out, they can be be brought back to life with a bit of imagination, a crochet hook and some yarn. Here are three that I plan on working on and I have finished the first one.

crochet an old light shade 2

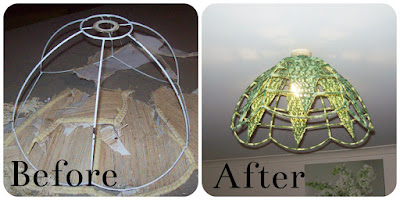
I wanted a simple and open light light shade to go over the dining table.

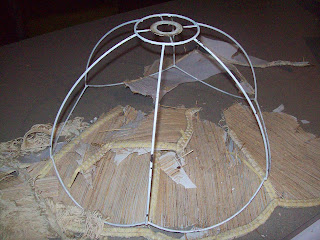
I cut and tore the existing shade off it's frame
crochet an old light shade 3
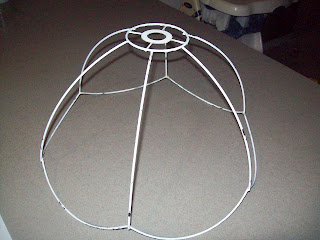
 I then gave it a clean
crochet an old light shade 3
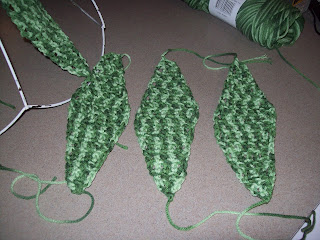
 I crocheted some diamond shapes to fit within each section
crochet an old light shade 4
Then I tied them on at each end
crochet an old light shade 5
I used a budget acrylic yarn
crochet an old light shade 6
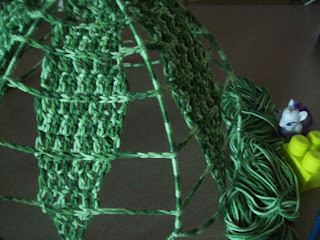
 Next I had to secure the diamond shape with some chains and slip st's, I began at the center of the diamond on the frame, to keep it evenly placed
crochet an old light shade 7
I added more rows of chains and sl st's at an even space
crochet an old light shade 8
Then I began to wrap the exposed frame with a sl st, I used my fingers instead of the crochet hook as it was easier for me
crochet an old light shade 9
I could have added more elements to the light shade, but as I said I wanted something simple.
crochet an old light shade 10
I'm glad I took the time to wrap the exposed frame, the variegated yarn looks quite impressive.
Thanks for taking the time to read my post
I have another light shade I made not long ago if you would like to see that, just follow this link
crochet an old light shade again